Quantcast
Channel: Model Aviation Online Features
Viewing all 1326 articles
Browse latest View live

Bill Holland's Fokker Dr. I

$
0
0


Written by Stan Alexander and Bill Holland
Insight into building a 1/2 scale model
Construction
As seen in the October 2017 issue of
Model Aviation.


Bonus Photos

Model Aviation Magazine - Bill Holland's Fokker Dr. I


Specifications

Wingspan: 142.2 inches
Length: 108.7 inches
Weight: 122 pounds
Engine: 3W 275 Twin Spark
Propeller: 37 x 13


Equipment Used

Radio: Futaba 12FG transmitter with two receivers, one in the fuselage and one in the top wing; two 4,200 mAh NiMH batteries with BatShare in the fuselage to the receiver and two 2,550 mAh in the top wing; four Futaba S9157 servos, three Futaba S9156s, and a Futaba S3305 for the choke
Covering: Poly-Fiber Aircraft Coating and Ceconite 102
Paint: Poly-Tone paint in Tennessee red, white, and black


Construction

Building that special, once-in-a-lifetime Scale model is the dream of most modelers who try to recreate history with their skills. I’ve been following Bill Holland’s progress for some time now. As he stated, before you start, make sure that your shop, workbench, and transportation can handle a model of this size. This Fokker has its own 18-foot box trailer!

Bill’s 21/2-year odyssey included learning new, and sometimes full-scale, building techniques. It will give you a small glimpse into the dedication and determination it takes to see a project such as this to completion.

Bill and I hope this article ignites thoughts to help you venture out of your comfort zone and try new techniques—including building a model, no matter what size. The learning process can be frustrating at times, but the result can be rewarding and fulfilling.

The project came to fruition during the 2011 World War I Dawn Patrol Rendezvous event in Dayton, Ohio, while chatting with Glenn Torrance. You know how these things go—you talk with other modelers and grand ideas are spurred.

Glenn agreed to increase his 33% scale Dr.I plans to 50%, along with a few items, including the wing ribs, cowling, and metal hardware. Glenn’s kits are extremely accurate for obsessive Scale modelers such as Bill.

The idea was to have several of these flying at the 2014 Dawn Patrol Rendezvous, kicking off the 100th anniversary of the beginning of WW I. As modelers often do, Bill underestimated what he had bitten off and missed his goal by two years!


Airframe

Bill reviewed the plans and realized that there were some major preparations to be done before getting to the first step. The project began with building a workbench to accommodate a roughly 12-foot one-piece wing. So, phase one was joining his two building tables using 8-foot doors. You better have a large shop if you plan to build something of this scale!

Additionally, Bill had to decide which types of wood to use and where to order them from.

The fuselage was built over the plans with phenolic blocks shaped to receive the rounded dowels. The right and left fuselage sides were joined inverted to ensure that everything was square. Bill found the dowels at Baird Brothers Fine Hardwoods in Ohio. The hardwood used for the front fuselage, gear mounts, and firewall was nine-ply 1/2-inch birch used by cabinetmakers.


The fuselage takes shape. The carpenters’ level inside of the fuselage ensures that everything is level and balanced.


The full-scale aircraft was steel and had rounded loops at various joints. These added strength and a place to route the multiple internal wire rigging—providing strength and trueness of the fuselage.

Bill used a similar approach. He drilled a 1/8-inch hole at a 45° angle and pinned it with carbon-fiber rods. This process worked great and later provided a site at which to add 120 feet of 3/64-inch braided wires and 40 turnbuckles.


Tail Feathers

The tail feathers were straightforward to construct with a few long ribs and dowels. Bill used carbon-fiber rods for the leading edges (LEs) of the horizontal stabilizer and the vertical spar of the rudder. Carbon-fiber rods—both solid and hollow—were used to complete the fuselage, rudder, horizontal stabilizer, elevator, and ailerons. A great source for carbon fiber is a kite company called Goodwinds.


Bill’s wife, Sharon, with the rudder and elevator. This photo provides a good idea of the aircraft’s size.


The horizontal stabilizer was mounted with a three-bolt system similar to the full-scale airplane. The rudder, elevator, and ailerons are attached with scale hinging, which is the same as the full-scale aircraft. Glenn provided the sheet metal for these as he does in the 1/3-scale Fokker Dr.I kit that he offers.


The Landing Gear

The landing gear involved making a spar box to house ribs that were later sheeted with wood. There are two 1 1/4-inch aluminum tubes in front of and behind the spar box. The center of the spar box allows the axle to move up and down, incorporating a prototypical bungee suspension. Next, the four aircraft-grade aluminum tubing struts were attached to the sub-wing. These were secured to the belly of the fuselage.

Bill found the wheels and tires at Tractor Supply Co., all ready to go with bearings installed. These were covered with the same Poly-Fiber as the rest of the model and painted. Bungee cords were wrapped over the axle and standoffs, providing the necessary suspension. The tail skid was made from 1-inch birch and attached to a steel bracket at the base.

The top of the skid is internally attached to a bungee, allowing some suspension. The bottom of the skid has a metal bracket with a spade soldered to the center. This provides assistance with maintaining directional control when taking off or landing.


Wings

If you like building wings, then this is the airplane for you! The model is built as strong as Anthony Fokker’s original, and the spar box for each wing must be constructed. The top and bottom wings are one piece. The mid-wing is built to incorporate an aluminum spar box to plug into each half. The rectangular aluminum spar box is bolted to the top of the fuselage and is shimmed to establish the wing incidences.


The sub-wing takes shape for the landing gear and the wheels that were purchased from Tractor Supply Co.


The wings on the Dr.I needed to have the correct incidence and be parallel. The center wing cabane mount was made from 4130 chromoly steel. Bill had these pieces welded to match the four 1/4-20 steel bolts on the bottom of the top wing.

Next, Bill had to call in the troops to get this right. He needed extra hands! The fuselage, with gear in place, was placed with the tail in flying position. The mid-wing struts set the incidence for both the top and bottom wings. The outboard wing struts had to be spot-on to ensure that the wings were parallel.

Additionally, the steel bracket designed to receive the steel pin holds the wing struts in place and had to be right on or the incidence or the parallel measurements would be off. The top wing mounting bracket was secured to the aircraft aluminum airfoiled tubing.


The scale attachment points for the wings and struts..


A piece of steel was welded to the mount shaped like an H. The aluminum tubing was cut at the front trailing edge and the rear tubing LE to receive the piece of steel. This was initially tack welded by a friend who is an excellent welder. Following a check on all measurements and wing incidences, the final welding was done.

The next step was securing the steel plates to aluminum struts with steel pins and J-B Weld. This made for a super strong bracket and easy-to-remove top wing. Two flying wires were attached to the steel plate and cross attached to brackets on the firewall. These wires will not have to be taken off to remove the wings for transport.


Cockpit Details

Bill said that the cockpit details and Spandau guns were a lot of fun to build. He likes to doll up any aircraft that he builds. Airplanes that were flown 100 years ago had limited instrumentation; however, the cockpit items available are large and provide the opportunity to build and assemble something special.


This is the yoke for the cockpit, which was constructed from brass tubing soldered together. The yoke included controls for the guns, the elevator, and ailerons.


The pilot yoke was fairly complex with multiple functions. These included basic throttle control on the left side of the yoke, activation of the guns (either one or both sides together), and elevator-aileron movements.


Spandau Guns

These were started from Balsa USA 1/2-scale kits. There were multiple additions and changes to the final product, but the kit saved Bill a lot of time. Scale modelers find parts in some strange places. Bill created the gun muzzles from cake decorating tips! So look around—you never know where you’ll find parts.


Half-scale Balsa USA Spandau kits were the foundation for the finished machine guns.


The shell retainers on the left side of the guns were added to prevent hot shell casings from falling into the cockpit, which often caused fires or explosions in the full-scale aircraft. These were made from balsa, PVC pipe 90° fittings, and rubber tubing for the scale model. A great friend and fellow modeler, Scott Vickery, provided Bill with the ammunition, which is actual ammo with powder and the firing pin removed.


Additional Cockpit Details

Instruments include mixture control, altimeter, compass, and a castor oil indicator. These were all made by a 3-D printer from IFlyTailies. The Bosch starter magneto switch was made from balsa, plywood, and sheet metal. The seat belts were made from elastic found at a fabric store, with small buckles to tighten the belts. The four straps (two lap and two shoulder) were secured just as in the full-scale aircraft. Bill made each strap bracket from sheet metal.


Covering

Bill is an instrument-rated full-scale pilot and long-standing member of the Aircraft Owners and Pilots Association (AOPA), EAA, and AMA. EAA provides many classes across the country to help pilots gain the skills needed to build and maintain aircraft. One of the classes is “How to Cover an Aircraft Using the Poly-Fiber System”. The two-day class is offered across the US, along with classes that include topics such as sheet metal, electrical systems, and working with fiberglass and composites.


Bill applying Stits fabric covering to the fuselage. A model of this size requires a lot of work to cover.


Bill attended a class taught at an airframe and powerplant mechanics school in Fort Worth, Texas, on March 12-13, 2016. Two club members, Jim and Calvin Ellis, joined him for the weekend class. This outstanding program taught everything from fabric to paint application. The instructor, Lynn Bauer, is just amazing. You’ve likely seen her at Oshkosh AirVenture, Sun ‘n Fun, or in an EAA video.

Jim and Bill were miles ahead of the other students having worked with other fabrics on models for many years. Bill used the entire Poly-Fiber system to cover and paint his large Fokker.


The Pilot

This was a finishing touch for this project. Bill researched the physical dimensions of Manfred von Richthofen. Manfred was much smaller than his brother, Lothar. Manfred was 5 feet, 7 inches tall and weighed 147 pounds, according to the reference material found.


Manfred von Richthofen, the “Red Baron,” is seated in the cockpit.


Bill determined the approximate head circumference and height of the head needed, from the chin to the top. He contacted Lyle Vasser of Best Pilots who makes a 1/4-scale full-body model of Lothar von Richthofen. Lyle offers a variety of pilots and sizes and he agreed to take on this project.

Although he’s a master graphic designer and modeler, making a 1/2-scale head was a new venture for Lyle! He used actual photos of Manfred and converted them to a 3-D image with the measurements that Bill provided to obtain the 1/2-scale size. He next manufactured an exact replica of Manfred using a 3-D printer, complete with paint. The final replica of Manfred is an outstanding piece of art!


The pilot’s seat comes together. Bill took classes on metal work through the EAA and used what he learned for some of this construction.


The internal skeleton was made using PVC pipe and light plywood to form a torso. Bill’s wife, Sharon, made the complete body, placed it over the skeleton, and stuffed it with light foam. Sharon also made the pilot’s flying suit, including a flying helmet, from fabric and leather. Manfred’s boots came from a children’s shoe store and are a toddler size 5. The pilot weighs 2 pounds.


Dummy Engine

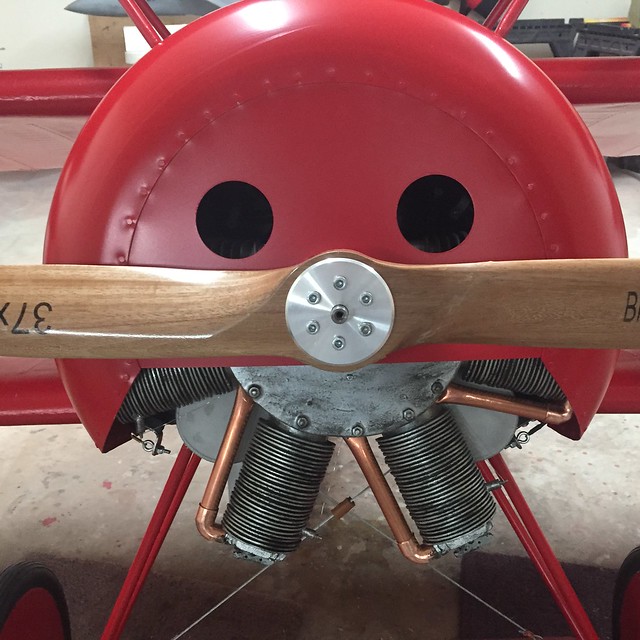
The final piece of this model was the replica rotary engine visible in the lower half of the cowling. The full-scale rotary engine spun on its crankshaft and spinning parts sometimes came off as the airplane flew.

The scale rotary engine was made from two fiberglass tubes cut in half. Cooling fins were built from basswood rings and applied to the fiberglass tubes.

The crankcase was made from balsa and light plywood. Bill made the simulated valve rockers on top of each cylinder from wood, adding springs and a few screws. The plugs are from Robart Manufacturing air-filling units for retracts and Bill attached a wire—creating a scalelike appearance. The intake tubes were made from copper obtained at a local hardware store.


The two-cylinder opposed 3W-275 Twin Spark engine swings a 37 x 13 propeller.


Add a little paint, weathering, and time, and voilà—a dummy rotary engine is born. The dummy engine is attached using three dowels from the firewall.


Color Scheme

The Fokker Dr.I aircraft flown by Manfred featured the original Iron Cross design. In late March 1918, the crosses were changed to the straight Balkenkreuz design. Manfred was killed while flying his Fokker Dr.I on April 21, 1918.

Bill’s 1/2-scale Fokker Dr.I features the Iron Cross design.


Flying

The big 1/2-scale Fokker Dr.I flew its first flight almost hands off. Living in Oklahoma provided challenging weather at times. Winter and early spring this year were windy and stormy—limiting the right day to maiden the aircraft. This is even more important when it involves test-flying a WW I aircraft.

The model was successfully flown at Bill’s local club field in Guthrie, Oklahoma, on April 23, 2017. Bill has since flown it several times.

—Bill Holland

—Stan Alexander
onawing4602@att.net


Sources:

Baird Brothers Fine Hardwoods
(330) 533-3122
www.bairdbrothers.com

Ace Hardware
www.acehardware.com

Glenn Torrance Models
(919) 761-1363
www.flygtm.com

EAA
(800) 564-6322
www.eaa.org

ZAP adhesives
(863) 607-6611
www.franktiano.com

Goodwinds
(206) 632-6151
www.goodwinds.com

Tractor Supply Co.
www.tractorsupply.com

Aircraft Spruce & Specialty Co.
(877) 477-7823
www.aircraftspruce.com

Balsa USA
(800) 225-7287
www.balsausa.com

IFlyTailies
www.iflytailies.com

Poly-Tone
(800) 362-3490
www.conaircraft.com

Best Pilots
lylevasser@yahoo.com
bestpilots.typepad.com

F&M Enterprises
(817) 279-8045
www.stits.com


BMJR Models Super Sniffer

$
0
0


Written by Dan Gaston
This FF model makes an enjoyable RC aircraft
Product review
As seen in the October 2017 issue of
Model Aviation.


Bonus Video


Specifications

Model type: Kit
Skill level: Intermediate
Wingspan: 44 inches
Length: 30 inches
Weight: 11.95 ounces
Construction: Wood; Coverite
Price: $73.75
Requires: Four-channel radio and receiver; two servos


Test-Model Details

Engine: Cox Babe Bee .049
Propeller: 5.5 x 3 Tornado
Radio system: Spektrum DX8 transmitter; Spektrum AR400 receiver; two Hitec HS-82MG servos; Thunder Power Pro Lite 380 mAh 2S LiPo receiver battery; Castle Creations CC BEC
Ready-to-fly weight: 11.95 ounces
Flight duration: 1 minute; 45-second engine run


Pluses

• Full-size rolled plans.
• Color-printed manual.
• Parts to mount different power systems are included.
• Full hardware package.


Minus

• Some discrepancies in the manual.


Product Review

How many times have you heard or possibly said, “I just don’t have the time to build?” Without a doubt, ARF/RTF model airplanes have brought this wonderful hobby to those who don’t have the time to devote to building.

There is much to be said for being able to open a new ARF box and within a few hours—or perhaps even minutes—being able to head to the flying field. Not every model airplane build needs to take months spent hunched over the workbench. There are a great many kits still available, and exponentially more plans, that can be built, finished, and made ready to fly in a short amount of time.

One of these kits is the BMJR Models Super Sniffer, a modernized version of a 1950s Free Flight (FF) model converted to RC. In fact, after only six hours of enjoyable construction time, I was admiring a completed airframe ready for final sanding and covering.


The Super Sniffer is a complete, quality kit at a reasonable price.


It should be noted that I build at a glacial pace because it’s how I relax and I enjoy it too much to hurry it along. Just opening a new kit can offer an hour of delight, if you take the time to read the manual, study the plans, and simply familiarize yourself with the kit and all of its contents.

If you still find the task of building a model airplane to be daunting, take the opportunity to enlist the help of a club member who builds. You might be surprised by the lengths a builder will go to in order to share this dwindling aspect of our hobby with a fellow modeler.

BMJR’s slogan is, “For modelers that like to build what they fly.” I believe that after you see how easy and enjoyable it is, you will become one of those modelers.


Construction

The included, color-printed manual begins with the assembly of the tail group. The horizontal stabilizer is a built-up assembly of open bay construction, which calls for a simple procedure to ensure a straight-and-true structure.

The following should be employed on any wing section of similar construction. Paper plans shrink and expand with fluctuations in humidity so the distance from the leading edge (LE) to the trailing edge (TE) might not match the actual length of the ribs.

If the spar is first pinned down on top of the plans, the ribs can be used to place the LEs and TEs. This is where laser-cutting shines. No longer are there ribs of varying lengths to give the builder problems. Right here is where previously taking the time to study the manual, plans (in this case, full-size, rolled plans), and kit contents will pay off because there are a few discrepancies in the manual. The answer to any question that the manual might present is likely on the plans or made clear by the parts themselves.

Neither the manual nor the plans are well defined on the 1/16-inch sheeting on the bottom of the horizontal stabilizer, but a little studying will make it clear that the sheeting is inlaid so it is flush with the bottom surface of the stabilizer. This provides a gluing surface for attaching the stabilizer to the fuselage.

After the stabilizer was completed, I noticed that the ribs’ TEs were beyond the 3/16-inch square TE by approximately 1/16 inch. At this point, I fired off an email to BMJR to see what I had done wrong. The company explained that they were intentionally left tall to allow the builder to fair the ribs into the TE. After a few minutes with a bar sander, the horizontal stabilizer was finished.


If you can find some old floppy discs, you will have the best lightweight airplane hinge material that the author has ever found.


The vertical fin and rudder are composed of a few pieces of laser-cut sheet stock. The rudder is where I made a minor, but important, modification. As supplied, the rudder is made up of two pieces with the grain running horizontally, which made for a rather flexible rudder. My solution was to remove a 3/16-inch slice from the rudder’s LE and replace it with a strip of vertical-grain balsa.

I slotted the tail surfaces for hinges before covering. On models of this size and smaller, I have yet to find a better hinge material than strips cut from floppy discs. They are not glued in until after the surfaces have been covered.

The wing is a polyhedral design containing four individual panels. What this means for the builder is three dihedral joints. This is one situation where I consider my miter sander to be indispensable. This simple tool allows a builder to sand the same angle, squarely on all adjoining faces of the spars, LEs, and TEs. A better-fitting joint is always a stronger joint.

The procedure is the same as that used for the horizontal stabilizer. Pin down the spar and use the ribs to locate the TE and LE. Here I found another discrepancy in the manual. It suggested shimming only the front of the TE, resulting in a wedge-shaped gap at the rib-to-TE joint. I remedied this by placing the shims under the TE front to rear. Following the manual for the order of construction makes it all straightforward.

When all four panels have been completed and removed from the board, the small tabs on the bottom TE of the ribs are removed and the ribs are sanded for a smooth transition into the TE and each panel’s LE is sanded to shape.

When joining the panels, it might be necessary to lightly sand the joints to get a nice fit. The key to a straight and true structure is to never spread apart a too-tight joint, and never pull together a too-loose joint. Doing either of these will practically guarantee a built-in warp.


Only a few hours of slow-paced, enjoyable building, and the BMJR Super Sniffer was framed up.


The laser-cut triangular gussets are an important structural component at each dihedral break, so make sure they aren’t omitted. Take the time to sand a V notch into those gussets that are used at the LE to give them as much gluing surface as possible.

If, after joining the panels and unpinning them from the board, you find there is a warp in the wing, all is not lost. This style of structure is rather flexible and relies on the covering for a great deal of its torsional rigidity. This means that you can remove all but the worst warps when you cover the wing.

The fuselage construction is as straightforward as it gets; however, a few tips will help ensure a straight and true structure. When joining the forward fuselage section to its aft section, I recommend pinning down the forward section on top of the plans.

The adjoining laser-cut, V-shaped joint is quite accurate, but will still allow for some misalignment. With the forward section pinned down, you can adjust the alignment of the aft section to follow the plans, ensuring a true fuselage side.

After both sides have been glued, but before adding the joint doubler, block sand both fuselage sides inside and out. This provides a true, flat joint on the inside over which to glue the doubler, and a nice smooth outer surface for your chosen method of covering. It’s possibly the most overused warning in modeling, but be sure to make a left and a right fuselage side.

When assembling fuselage formers F1, F2, and F3, I suggest the use of some sort of squaring tool(s). My preference is a pair of machinist’s 1-2-3 blocks. These simple blocks are another tool I use in nearly every build. They get their name by being 1 x 2 x 3 inches. By assembling this trio of formers squarely, a true fuselage is much easier to accomplish.

At this point, you must decide what will power the Super Sniffer. I used a Cox Babe Bee .049 glow engine because I love that 1/2A wail. Whatever your choice of power, the manual has clear pictures of the different nose configurations.


If you don't have a Cox Glow Plug Clip you can easily use a Ni-Starter from Sonic Tronics.


After that step has been completed, the fuselage is ready for the cross-grained sheeting on the top and bottom. Don’t simply grab whatever sheeting is at hand and start gluing it on. Select lighter, softer balsa for the aft section, and heavier, harder wood for the nose area.

I sheeted the top section first because this allowed me to pin the fuselage to the top plans view. After it is pinned down, the fuselage sides can be pinched together and glued using a square to ensure that the vertical glue joint is aligned over the centerline.

Carefully sheet the top to make sure a bow is not induced by pushing or pulling to one side. With the top of the fuselage sheeted, the assembly can simply lie upside down to sheet the bottom, but care must still be taken to not create a banana-shaped fuselage.

With all of the individual components completed, it’s time to give everything a thorough finish sanding. The order of covering and assembling, or assembling and covering, is dictated both by your choice of covering material and personal preference. I chose tissue and dope on the sheet surfaces (fin and fuselage), and Polyspan and dope on the open bay structures (wing and stabilizer). A lightweight iron-on film would have been easier and quicker, but again, I’m in no hurry.

I followed the manual to install the engine and radio equipment with no problems. Just make sure the servos and linkages are secured before you glue on the wrap-around windscreen. Had I used electric power, I probably would have installed the ESC in the cockpit area with the servos and perforated the sides of the windscreen to provide cooling air.


All that’s left to do is install the windscreen after the servos are thoroughly checked.


The final all-up weight of my Super Sniffer is 11.95 ounces. It balanced perfectly with no ballast necessary.

All that was left to do was wait out the weather.


Flying

Near the end of March, I was blessed with a decent day. The Cox .049 engine had been previously broken in, so I felt comfortable running it with the needle valve set extremely rich. Doing this greatly reduces the rpm, giving it a slower flying speed and allowing for a more relaxed initial trim flight.

With the engine blubbering away, the Super Sniffer was given a gentle hand launch into the breeze and it was off on its maiden flight. With no trim changes necessary, I let the airplane gain what altitude it could to give me a taste of the glide when the engine quit. When the engine did quit, the Super Sniffer transitioned seamlessly into a wonderful flat, slow glide.

The next flight was undertaken with the Babe Bee running full throttle. The model climbed out with too much authority for only a second flight, so I dialed in three clicks of down-trim. After only 2 minutes or so of engine run, the Super Sniffer was just a speck in the sky.

While the engine was still screaming away, the wind aloft brought the airplane to a complete halt (undercambered airfoils aren’t known for their penetrating abilities). A shallow dive brought it back upwind with enough altitude left to enjoy watching a classic shape float around in lazy circles.

As I write this, summer is on the way, and with it comes afternoon thermals. I’ll be ready with my BMJR Super Sniffer, a quart of Sig 1/2A fuel, and a lawn chair because I know this airplane is going to be up there for some long flights.

Blue skies.

—Dan Gaston
dagaston1431@gmail.com


Manufacturer/Distributor:

BMJR Models
(321) 537-1159
www.bmjrmodels.com


Sources:

Horizon Hobby
(800) 338-4639
www.horizonhobby.com

Hitec RCD
(858) 748-6948
www.hitecrcd.com

Castle Creations
(913) 390-6939
www.castlecreations.com

Thunder Power
(702) 228-8883
www.thunderpowerrc.com


7th Annual Katie Martin International Tribute Fly-In

$
0
0


Written by Dave Garwood
RC Slope Soaring
Column
As seen in the October 2017 issue of
Model Aviation.


This video originally appeared in the July 1 edition of AMA's webcast: AMA Air. Find more episodes at http://air.modelaircraft.org.


No person in the history of Slope Soaring was likely more beloved than Katie Martin. Unfortunately, she died before her time. Her husband, Bob Martin, has led a memorial Slope Soaring flying event in her memory for the past seven years.

The event runs with the support of the Torrey Pines Gulls, a well-known and active Soaring club in California. This coverage of the 7th Annual Katie Martin International Tribute Fly-In, held June 3, 2017, was written by Dale Gottdank, the Torrey Pines Gulls newsletter editor, and was photographed by Ian Cummings, vice president of the Torrey Pines Gulls.


Pilots and sailplanes gather around the RC mound at the Torrey Pines Gliderport. Cummings photo.


For the past seven years, Bob Martin and the Torrey Pines Gulls RC Soaring Society have sponsored the Katie Martin International Tribute Fly-In at the historic Torrey Pines Gliderport in La Jolla, California. It’s called the “International” Tribute because Slope fliers in far-flung places such as Spain, Germany, England, and Venezuela pay tribute too, adding their own local events to the home event here in San Diego. Some attendees travel hundreds of miles to participate.

Most Slope Soaring pilots know Bob from the cutting-edge kits that he and his wife, Katie, designed and produced, including the Bobcat, Talon, Katie II, SR-7, and Coyote, to name a few.


Bob Martin and his friends with the Hobie Hawk and SuperHawk sailplanes. Cummings photo.


In 1979, Bob and Katie purchased the tooling for the well-known Hobie Hawk sailplane, producing kits from 1980 to 1986. In fact, Katie’s favorite sailplane was a beautiful blue and white Hobie Hawk, but more about that later. Earlier this year, Bob shared this summary of Katie’s achievements and the fly-in:

“For more than 25 years, she was well known in our industry for her enthusiasm and charm at events and trade shows throughout the country. She also holds the distinction of being the first woman to fly RC in Costa Rica. She served as [an] AMA club president for two consecutive years, and secured a flying site for her club in the Santa Fe Dam area.

“She worked hard for various clubs in many roles, including newsletter editor, and in 1988 [she] was named the AMA National Newsletter Editor of the Year. She also was awarded the Hawk of the Year, an honor going to the member of the Desert Hawks Club [who] made the most impact on the club that year.


Bob Martin ran the charity raffle. The grand prize, a Hobie Hawk, is in the foreground. Raffle proceeds of $1,000 were donated to the American Heart Association. Cummings photo.


“She was also the inspiration who led to the formation of Bob Martin RC Models in the mid-1970s when she asked for and received a Hobie Hawk. That same Hobie Hawk is flown in the Katie Martin Tribute with a small amount of her ashes epoxied into the nose.

“Katie was all about having fun and enjoying the sport. Therefore, in line with that attitude, this event is open to all sailplanes regardless of manufacturer or type. It is an open fly-in; the only rules are those of safety. I look forward to meeting and talking with those who join us in celebrating the legacy of a great lady.”

Katie passed away in December 2010. The following year, the Katie Martin Tribute Fly-in was born. For more about how this came to be, read Bob’s January 2015 post on RCGroups. The link is listed in “Sources.”


Bob Martin launches Katie’s Hobie Hawk, piloted by Brent Daly. Cummings photo.


This year’s fly-in had a great turnout, with more than 100 aircraft and almost as many pilots! Most pilots brought at least one of their Bob Martin RC Models sailplanes and many brought several. Of course, there was a large contingent of Hobie Hawks and SuperHawks.

As in previous years, Bob welcomed everyone to the event and gave his dedication speech about Katie, followed by a moment of silence. Afterward, Bob launched Katie’s original Hobie Hawk, piloted by Brent Daly.

Next, a one-of-a-kind SuperHawk, donated in Katie’s honor by Tony Johnson of Synergy Composites, was launched by Paul Anderson and piloted by Gregg Bolton. Both sailplanes are identically finished in blue and white and shared the sky over the Gliderport for all to see.


Various Bob Martin RC Models sailplanes were brought to the event. Cummings photo.


Following some fun flying, it was time for the raffle. Donated prizes included several sailplane kits, ARFs, accessories, modeling tools, and a computer flight simulator package. The grand prize was a beautiful orange and white Hobie Hawk donated by John Cole.

The rest of the day was filled with fun flying and chatting with friends. Delicious sandwiches were available from the Cliffhanger Café at the Gliderport. It was a great day of Slope Soaring camaraderie, with everyone looking forward to next year’s Katie Martin International Tribute Fly-In.

-Dave Garwood
dave.garwood.518@gmail.com


Sources:

Katie Martin International Tribute Fly-In RCGroups threads
http://bit.ly/2uuyWNM
http://bit.ly/2sun7pz

Torrey Pines Gulls
www.torreypinesgulls.org

League of Silent Flight (LSF)
www.silentflight.org

Bob Martin
rk57ent@gmail.com

Dale Gottdank
dgottdank@gmail.com

Ian Cummings
ian@iancummingsphoto.com


BMJR Models Satin Doll

$
0
0


Written by Dan Gaston
Dave Platt’s classic design, updated for electric RC
Product review
As seen in the October 2017 issue of
Model Aviation.


Bonus Video


Specifications

Model type: Kit
Skill level: Intermediate
Wingspan: 42 inches
Wing area: 400 square inches
Length: 34 inches
Weight: 20 ounces
Construction: Wood; Coverite
Price: $99.75
Requires: Four-channel radio and receiver; two servos


Test-Model Details

Motor and ESC: E-flite Park 370 motor; Castle Thunderbird 36 ESC
Battery: Thunder Power 3S 1,350 mAh and Ready Made RC 2S 1,300 mAh LiPo batteries
Propeller: GWS 8 x 4
Radio system: Spektrum DX8 transmitter; Lemon Rx six-channel receiver; two Futaba S3114 servos
Ready-to-fly weight: 18.25 ounces (2S); 19.05 ounces (3S)
Wing loading: 41.9 ounces per square foot
Flight duration: 7-plus minutes


Pluses

• Full-size rolled plans.
• Color-printed instruction manual.
• The kit includes nearly everything necessary to complete the model.
• Just beautiful in the air.


Minus

• Discrepancies among the plans, instructions, and parts.


Product Review

It’s hard to believe that it’s been more than 20 years since I first saw the original Satin Doll on the cover of the January 1996 issue of Flying Models magazine. That issue is still on my shelf and the Dave Platt-designed Satin Doll has lost none of its appeal in the last two decades. Those two decades have also proven me to be a professional-level procrastinator because I still haven’t built one.

In the early spring of 2017, I ran out of excuses because BMJR Models announced its new electric RC Satin Doll kit. I immediately fired off an email to Brian Malin (the talented man behind BMJR) to see if he could bring a kit to the Weak Signals Toledo Show: R/C Model Expo in April. The show weekend finally arrived and there, along with a selection of its other fine kits, was a stack of Satin Doll kits.

My first impression of the kit was how much model airplane there is for such a reasonable price. In fact, it takes two boxes to hold everything. In addition to the 22 beautifully laser-cut sheets and dimensional wood stock bundle, there is a comprehensive hardware package.

This package is complete to the point of including wire-in-tube pushrods, wheels, prebent landing gear, hinges, control horns, and much more. There are two full-size, rolled plans sheets and a color instruction manual, so there’s no need for a laptop on the workbench.


This shows the contents of the kit. It is a lot of model airplane for the money.


Before beginning the construction of any model, it’s always advisable to pour over the plans and any included written instructions to familiarize yourself with the order of the build and any procedures that may be new to you. This does not guarantee a snag-free build, but it can help you avoid building yourself into a corner.

During the build, I used my usual selection of CA glue, aliphatic adhesives, and epoxy; however, this time I tried new glue from Deluxe Products called Super ’Phatic, which I’ll write more about later. I’ve been using Deluxe Products Cover Grip to apply non-adhesive-backed coverings for some time, so I felt confident concerning this new glue.

At this point I want to state that this is absolutely not a beginner’s kit. A basic understanding of construction methods and procedures is a must.

The manual begins with the construction of the upper wing. There are a few typos in the manual within the first few steps, but these mistakes are easily figured out by referencing the accompanying photos and/or the plans.

The wing’s trailing edge (TE) was one such point of confusion. The manual calls out one size, the plans call out another size, and the supplied TE stock is yet another size.

The builder needs to work with the TE stock in the kit, which matches the drawn size on the plans, but again, not the callout. The builder is given the choice of notching the TE stock to accept the ribs or sanding a similar amount off of the rib’s TE and settling for a butt joint. I chose the stronger method of notching the TE using a jigsaw blade with a wide kerf that just happened to be 1/16 inch.


The author used a wide-kerf jigsaw blade to slot the TE to accept the ribs.


Here is where I tried the Deluxe Products Super ’Phatic glue. To say that I was impressed is an understatement. This aliphatic glue wicks into joints as though it was thin or medium CA glue, sets up quickly, and results in a strong, flexible joint like a “normal” aliphatic.

The balance of the upper wing construction is straightforward, thanks to the laser-cut ribs and simple laminated leading edge (LE).

Before gluing on the laminated LE, take the time to sand the slight bevel on the nose of the ribs. The wing’s center section had another issue with TE sizes. The center section ribs are cut according to the shown 3/4-inch TE, but the supplied TE stock is only 1/2 inch. My solution was to simply glue some 1/4-inch square stock from my scrap box to the TE to make it measure 3/4 inch.

This was then notched for the center rib and sanded to the TE profile after the center section was finished. I sanded the wing panels before joining them to the center section, which included fairing the ribs into the TE and rounding the LE and wingtips. The charred edges of the laser-cut ribs help let you know when you’ve sanded enough because the darkened edge disappears.


Take the time to sand a bevel on the rib snouts for a better, stronger joint with the laminated LE.


When joining the panels to the center section, the manual says to prop up the panel 1.5 inches at rib number 13. This left some of the plywood dihedral brace protruding below the bottom of the ribs. I found 1.25 inches at rib number 13 to be ideal and this brought the dihedral brace into perfect alignment with the bottom of the wing panel.

The lower wing construction mimics that of the upper with the exception of the center section and the manner in which it mates to the outer panels. Again, it’s not difficult, but a builder must pay attention to all of the information available in the plans, photos, and written instructions. I could have finished the wing in a much shorter timeframe, but I admit to spending time simply admiring that wonderful shape pinned to my building board.

The tail components are straightforward and hardly warrant mentioning, but there is one feature that might seem odd simply because it goes against convention. There is an elevator on only one side of the horizontal stabilizer.


The classic wing shape of this biplane is appealing.


I’ve been doing this on all of my converted Free Flight builds, and I can assure you that it has no negative effects on the flight characteristics. In this case, the TE of the horizontal stabilizer is V shaped, which would require two servos to drive the elevators because they are not aligned. My reason for always having done it this way is far less technical—I’m just lazy that way.

The fuselage structure is a nice mixture of old-school stick construction and modern laser-cut, tab-in-slot construction. There’s a lot going on in the forward section of the fuselage, so I strongly suggest that you dry-assemble it first. The manual suggests a certain order of assembly and if you follow it, there should be no problems.

The balsa and plywood cowling would be an alignment nightmare to assemble were it not for a simple, but brilliant, cruciform jig that the 10 individual pieces simply slide over and are glued as they are stacked.

After the glue has set, the jig is removed and the eight 1/4-inch balsa layers are sanded to follow the fore and aft plywood layers. The cowling is secured to the fuselage using the supplied rare-earth magnets. The motor mount is composed of an inner and outer plywood box. The motor is mounted to the inner box, which slides inside the outer box to allow fore and aft adjustment before gluing in place after the proper spinner clearance has been established.

When it was time to attach the tail feathers, it seemed to be open to the builder’s preference. Again, this is where having previous building experience will allow you to breeze through the job after some studying and planning.


The BMJR Satin Doll is a great mix of old-school stick-built and modern laser-cut construction.


After all of the individual components have been built, it’s time to sand everything to final shape and surface smoothness. Anything you leave rough at this point will be magnified through the covering, so take the time to do it right. I chose Coverlite covering and applied it using Deluxe Products Cover Grip and a modeling covering iron and heat gun.

Cover Grip is a water-soluble, heat-activated adhesive that is brushed onto the wood wherever the covering needs to be adhered. I left the covering in its wrinkled state until the final assembly before the maiden flight. There is a statement in the instruction manual concerning the negative effects of a warped wing. Believe it!


Flying

My BMJR Satin Doll’s maiden flight was as benign as a flight can be. I went with a takeoff from our club’s grass strip.

The Satin Doll didn’t take off as much as it just seemed to levitate. I immediately knew that the E-flite Park 370 had too much power—at least for the way I think this airplane should fly. The model settled down after I powered back to nearly 1/4 throttle. A few trim adjustments were needed to keep everything pointed in the right direction, but it was obvious that I had built something special.

For the next flying session, I replaced the 3S LiPo battery with a 2S 1,300 mAh LiPo battery. This removed nearly an ounce of weight aft of the balance point and still provided more than enough power. The video of the Satin Doll in flight is with this 2S setup.

I do not know if this airplane is capable of loops, rolls, or other maneuvers, and it’s likely I’ll never find out. To me, the BMJR Satin Doll seems made to putter about on calm mornings or evenings. I don’t think I will ever grow tired of seeing that beautiful shape fly by.

—Dan Gaston
dagaston1431@gmail.com


Glider Clubs and the Park Pilot Program

$
0
0


Written by Ed Anderson
Any club can benefit
For members
As seen in the June 2008 issue of
Model Aviation.


On the surface the AMA Park Pilot Program seems to address the needs of people who are flying those small, electric-powered models we call park flyers. But I believe it can do more.


Most beginner-level park flyers are essentially powered gliders. The Hobby Lobby Wingo USA is a fun and versatile trainer. Shawn teaches son, Devin, about trim.


I started out as a park flyer pilot, but now I fly gliders most of the time. Many Long Island Silent Flyers (LISF) members have gone down the same path. After I share this path with you, you may decide that the AMA Park Pilot Program could help your sailplane club.

If you stop in at the local hobby shop and look at the models it sells, you will likely see piles of RTF electric airplanes, some receiver-ready electric aircraft, electric ARFs, and even some electric airplane kits. There may also be a display of RTF glow-powered models, some glow ARFs, and maybe some glow kits.

Where are the gliders?

If the shop has any, it may be a Spirit kit, a Gentle Lady ARF, or an e-Aspire RTF sitting on top of a rack somewhere. There will probably be a thick layer of dust on the box. If the store has a histart, it will most likely be a short one and will probably have been there for a while.

The majority of people have not had exposure to RC sailplanes. The only experience many have had with these types of models is the $1 balsa variety or maybe a $5 foam chuck glider that never flew right. So why would these people come looking for gliders?


All these models qualify for the AMA’s Park Pilot Program. Local clubs may have their own recommendations as well.


Most people, and I’m included, have never seen a full-scale sailplane in the air or on the ground, but they have seen many airplanes with engines. Numerous people have dreamed of flying, and those dreams probably include an engine, the drone of the propeller, or maybe even the whine of the turbine. So when they want to start flying model airplanes, that is what they look for and that is what the hobby stores stock.

If one of these new park flyer pilots came upon your glider field, would you welcome that person or would you tell him or her that you only fly sailplanes at the site and send the flier away? If you do the latter, you are missing the opportunity to develop a new glider pilot.

When I started, I bought a HobbyZone Aerobird 3 RTF Electric: a three-channel, pod-and-boom park flyer. A friend told me that there had been a glider club a mile from my home for more than 25 years. I never knew about it, even though I had wanted to fly RC airplanes all my life. I never noticed the pilots were there, because they were quiet.

A friend had joined that club with a HobbyZone Firebird electric park flyer; the club had recently opened its membership to these small models, viewing them as trainers. If you look closely, many of these RTF park flyers are really electric launched sailplanes in disguise.

A two-channel Firebird is really an electric launched glider. When you cut the power it soars nicely, needing only rudder control to guide it around the sky. And it thermals too. The same applies to my Aerobird, a ReadytoFlyFun.com THawk, a Multiplex EasyStar, and many RTF park flyers. That is what makes them so easy to fly.

People often remark that gliders are the best trainers, and these airplane makers seem to agree. In fact, the president of the LISF at the time I started had learned to fly with a Firebird.

If you start thinking about these models as electric launched sailplanes, perhaps it would be a good idea to welcome these new pilots into your club and teach them how to fly their new aircraft. Naturally you would instruct them in the glider-pilot style and teach them how to operate on a glider field. They would learn how much fun it is to fly their models with the motor off and to catch thermals.


Learning to take off and land is as simple as a hand launch—a procedure Soaring clubs are familiar with teaching.


The first time I managed to get my Aerobird up into a thermal, I was hooked. Because I was surrounded by sailplane pilots, I received all kinds of coaching on how to hunt for thermals, work thermals, and enjoy extended flight time without the use of my motor. This was cool!

Six months after I joined the club—having no idea about or interest in gliders—I bought Great Planes’ 2-meter Spirit. Of course, it was an RTF package. In addition I purchased a hi-start. That winter a Slope Soaring pilot showed me how to slope-soar my Aerobird. Soon after that I was flying a Zagi slope wing. My sailplane fleet was growing.

Today our club has a growing number of pilots who have followed a similar course. They learn to pilot their park flyers, and then they learn to fly them like gliders.

We even have monthly climb-and-glide, limited-motor-run contests. Park flyer pilots are encouraged to join. We do a two-minute maximum motor run and a six-minute task, with landing points for putting the airplane in a large circle.

Last season the top score was achieved with an Aerobird. Oddly enough, the pilot normally flies a Pike Superior, but he started on that Aerobird.

Today the first real sailplane these people typically buy is a Multiplex Easy Glider or Easy Glider Electric. Soon afterward they move on to 2.5- and 3- meter models and start flying in club Thermal Duration contests. They learn how to launch with a hi-start and a winch. You may be thinking, “This is all good stuff, but what does it have to do with the Park Pilot Program?”

Many glider clubs fear that once they let in the electrics, they will take over. And that has happened to some sailplane clubs. Sometimes it is because of a large influx of new electric-power pilots, but just as often the existing members take up electric flight too. After a while the glider fliers diminish as other pilots bore holes in the sky.


The electric-powered HobbyZone Aerobird 3 is extremely durable and thermals very well.


People forget that this fade of glider pilots was happening anyway. They point the finger at the electrics and say, “They did it to us,” but they probably didn’t. What really happened was that there was no plan.

If you make a plan and work it, you can bring in new park flyer pilots with the understanding that yours is a sailplane club first and foremost. Aircraft flown at your field will be done so in a “glider-like” manner and at low to moderate speeds. If you state this up front, people will understand that your club is not for speed jockeys, 3-D pilots, etc.

I have learned from experience that if you take this approach, roughly half of the members will eventually take up gliders in addition to whatever else they fly. Some will also belong to other clubs in which they can fly their high-speed or 3-D airplanes.

The Park Pilot Program brings in a clear definition of what a park flyer is and what it is not. It includes small airplanes—weighing 2 pounds or less—that are quiet and incapable of flying faster than 60 mph on a flat run. They must be electric or rubber powered, or of any similar quiet means of propulsion, and that includes pure and electric sailplanes.


Whether flying competition aircraft or RTF park flyers, a thorough preflight inspection is a good idea.


According to that definition, Gentle Ladys and Easy Gliders are park flyers. Hand-launched and discus-launched gliders are also park flyers. That means new pilots who show up at your field with AMA Park Pilot Program membership cards can fly sailplanes. If they ever want to fly something larger than the program permits, all they have to do is upgrade their membership with the AMA.

A concern about the Park Pilot Program is that these new pilots have a lower level of personal insurance coverage than regular AMA members. What impact does that have on the club’s insurance? The AMA has confirmed that having Park Pilot Program members in a club has no impact on its coverage. Your club coverage is the same as always and will not be compromised in any way.

If your flying-site property owner requires that all your club members are AMA members, those who are part of the Park Pilot Program meet that condition. Unless your lease or agreement for field use specifies a dollar amount of personal coverage for each member, a Park Pilot Program member is covered.

Admitting Park Pilot Program members does not mean you have to adopt the full extent of the program’s definition. If you feel that an Aerobird or an EasyStar would be acceptable but you would not want airplanes zipping around your field at 59 mph, amend your club’s bylaws to reflect this.


Safety is the most important point to learn. Flying with a friend is more fun, and the extra pair of eyes on the flightline means fewer accidents.


You could declare a top speed for models at your field of, say, 45 mph. That is moderate. My Easy Glider Electric, with a brushless motor, tops out at approximately 45 mph. You could further stipulate that all flying below treetop level should be at less than 20 mph, to be compatible with models that are on approach and preparing for landing.

The numbers are unimportant. What is important is that you have always had the right to set guidelines for how flying is conducted at your field; the Park Pilot Program does not change that.

Gliders always have the right of way. That would not change. And you would train these new pilots to fly properly with gliders. They would learn where and how to launch and where and how to land, according to your procedures.

Do not radically transform your sailplane club into an electric club. Incorporate slow- to moderate-speed electric-powered models into your club’s design.

Welcome these new pilots, train them, and introduce them to gliders as a path they have not considered. You will find that these new fliers and the AMA Park Pilot Program could be good friends and bring new energy to the life of your sailplane club.


Dayle Cook, who has been learning to fly gliders, is shown preparing to make one of his first unassisted winch launches. He has since flown in competition in the Eastern Soaring League.


Gliding in the Park

Many park flyers are similar to gliders. The pod-and-boom park flyers in particular, such as the Firebird and Aerobird, the ReadytoFlyFun.com T-Hawk, the Multiplex EasyStar, or even the Hobby Lobby Wingo, bear a strong resemblance to discus-launched and many 2-meter histart- launched sailplanes.

The pod-and-boom park flyers’ undercambered or flatbottom wings allow them to fly at extremely slow speeds, and they glide well when you power off. They glide even better if you can set the ESC to enact a propeller brake or replace the ESC so you can stop the propeller’s freewheeling.


Ed Anderson (R) holds his Aerobird: his first RC airplane. Pete Nicholson, Ed’s instructor, holds his 3-meter Supra competition Thermal Duration sailplane. Notice the similar pod-and-boom designs.


Although those park flyers may not glide as well as “true” sailplanes, they do so well enough to teach flying with the motor off. Any of them can thermal well enough to introduce thermal-duration flying to a new pilot.

You may not have considered these park flyers as trainers for glider pilots, but with some creative thought you can help those new fliers learn to soar.

-Ed Anderson
aeajr@optonline.net


Sources:

Park Pilot Program
(800) 435-9262
www.modelaircraft.org/parkflyer.aspx


Matchmaking

$
0
0


Written by A.G. "Andy" Lennon
Match a model’s performance to a pilot’s skill level
How to Do It
As seen in the June 2007 issue of
Model Aviation.


Definitions for the Beginner

Altitude: Air density reduces with altitude. This is reflected in the constant number in the thrust formula.

Altitude (Feet)Constant
Sea Level0.000011127
1,0000.000010806
2,0000.000010490
3,0000.000010182
4,0000.000009881
5,0000.000009581
6,0000.000009301

ARF: Almost ready to fly.
BHP: Brake horsepower.
CID: Cubic inch displacement.
mph: Miles per hour.
PLF: Propeller Load Factor (diameter2 x pitch).
PL: Power loading (ounces of model weight per cubic inch of displacement).
rpm: Revolutions per minute.
Stability: A model’s ability to return to level flight after a gust or when controls are centered.
Torque: Turning force in inch-ounce.
Trim: Adjust controls for level flight.
TWR: Thrust-to-weight ratio (measured in percentage).
Wing area: Constant chord-chord x span (in inches)

Tapered-(Root Chord + Tip Chord) x Span ÷ 2

Divide square inches by 144 to get square feet.

Wing loading: Ounces of model weight divided by the wing area in
square feet. The result is ounces per square foot of area.


Scale aircraft have engine needs that often go beyond propeller selection. Engine sound adds realism, and selecting the right combination can improve judging scores.


Matchmaking

Matchmaking proposes a logical engineering approach to selecting a model, engine, and propeller, and the combination’s performance and flying characteristics will be a match for the pilot’s flying-skill level—or for a beginner with no flying skills at all.

This article includes simple formulas involving public-school arithmetic that are easy to solve on an inexpensive pocket calculator. It needs to be the “scientific” type, which has square (x2) and square root (√) buttons.

The article is divided into sections that cover the model, the engine, estimating thrust, selecting a propeller, and information sources. It is aimed toward the beginner but contains information that will be of interest to the expert.


An Aerobatics model requires the right balance of thrust for strong vertical performance, but also needs to be quiet to adhere to AMA noise rules.


The Model: A beginner needs a stable, relatively slow-flying airplane that virtually flies itself and has limited aerobatic capabilities. Its basic specifications include a .40-size engine, a 700- to 800-square-inch wing area, and a wing loading that does not exceed 20 ounces per square foot of wing area.

This aircraft’s airframe will have high drag from an exposed engine and large wheels on its tricycle landing gear, which will allow for a steeper glide slope that makes judging landing approaches easier.

It will have full proportional control of the ailerons, elevators, rudder, and throttle. The student is well advised to join a local RC flying club. Most have experienced pilots who instruct. They will check the model for the correct CG location, fully charged batteries, a fueled tank, and correctly functioning controls.

The instructors will start the engine and adjust the needle valve for high rpm and idle, and then test-fly and trim the airplane for level flight. They will stand by the novice as he or she flies the model, and they will be ready to take control if problems arise until the beginner has developed adequate skills to fly alone.


Warbird models are famous for high-speed low passes. The airplane’s smooth outline means it requires a lower-pitch propeller.


The expert flier wants high power in relation to his or her model’s weight, to pull the airplane easily and smoothly through maneuvers that include sustained vertical climbs. The aircraft must have relaxed stability for good aerobatics, and high wing loadings with fast takeoffs and landings are no problem for this pilot.

Popular models for the expert are scale versions of aerobatic monoplanes and biplanes, such as the Extra 300 and the Ultimate biplane. RC Aerobatics pilots fall into this category.

The rest of us fliers fall somewhere in between the beginner and expert classifications. Table 1 provides suggested parameters for all three classes of pilots.

ClassSpeed (mph)Wing Loading (ounces/square foot)PL (ounces/CID)
Two-Stroke
PL (ounces/CID)
Four-Stroke
Expert100-12525-35100-20090-180
Intermediate80-10020-25200-250180-225
Beginner60-8015-20250-300225-270
Table 1

Power loading (PL) is a convenient way to relate weight to power for comparison purposes. A model that weighs 92 ounces and is powered by a .46 two-stroke engine would have a PL of:

92 ÷ .46 = 200 ounces/CID


A two-stroke .46 engine can use any of more than a dozen 9- to 11-inch-diameter propellers. One of those will be right for the aircraft and the pilot combination.


A 175-ounce model powered by a l.20 CID engine has a PL of:

175 ÷ 1.20 = 145 ounces/CID

To select an engine’s displacement requires the model’s weight and the PL to be selected. The formula is:

Model Weight (ounces) ÷ PL (ounces/CID) = Engine CID

For a model that weighs 100 ounces and has a PL of 250 ounces/CID:

100 ÷ 250 = .40 CID engine

In my experience a two-stroke PL of 200 ounces/CID permits a sustained vertical climb to almost out-of-sight altitude.


Multicylinder engines have special propeller requirements ranged to suit their limited performance.


The Engine: The power of an engine is expressed in two ways: torque and/or brake horsepower—both at specific rpm.

Torque is the elemental force that rotates the propeller. To obtain the maximum thrust, the propeller’s diameter and pitch should load the engine to an rpm of the highest torque.


Figure 2a


Figure 2a illustrates the output of a .61 CID engine, which is an excellent sport power plant. The torque curve is almost level, peaking at 10,500 rpm. This engine can effectively rotate a wide range of propeller diameters and pitches: large diameter and low pitch for slow-speed flight or smaller diameter and larger pitch for faster speed.

Sport engines operate in a 6,000- 13,000 rpm range. The large engines develop their maximum torque at the lower rpm.

Brake horsepower is a calculated figure. It is:

Torque (inch-ounce) x rpm ÷ a constant number (engine expert Dave Gierke uses 1,008,000).

Increases in either (or both) torque and rpm will result in an increase in horsepower. The rpm figure is increased by using small propellers with low pitch, which reduce the load on the engine. These propellers are too small for practical sport-model flying.


Figure 3


Some engine manufacturers have adapted racing-engine technology to their power-plant designs. That moves the peak of the torque curve closer to peak rpm, further inflating the horsepower output, but to the detriment of torque in the sport rpm range. See Figure 3.

The automotive people are more candid. They advertise horsepower and torque, such as “200 horsepower at 6,000 rpm = 275 foot-pounds of torque at 4,400 rpm.” Ads in model aviation magazines quoting “1.6 horsepower at 16,000 rpm” have little significance for practical propeller selection. Torque is the figure to use.

Model engines fall into the three following groups.

1) The engine has had a review published that provides the horsepower and torque curves along with a tabulation of rpm for a range of suitable propeller diameters and pitches for that engine. Figure 2 (a and b) is typical.

2) The engine has been reviewed, but only the tabulation of propeller rpm is quoted.

3) The engine has not been reviewed.

APC Propeller
Diameter x Pitch
rpmThrust
(ounces/second)
Speed
(mph)
11 x 713,400126110
12 x 6>13,40011582
12 x 810,50013495
12 x 610,10013380
Figure 2b


Thrust Estimating: A propeller rotating at high rpm blasts a column of air backward. The equal and opposite reaction (Newton’s third law of motion) propels the airplane forward.

The air coming off the propeller has volume weight and velocity. Air weighs 1.22416 ounces/cubic foot at sea level. It is possible to calculate the weight of this air blast, providing thrust/second. I have developed a simplified formula for thrust estimating. It is:

Diameter2 (inches) x nominal pitch x static rpm x .000011127 = thrust in ounces/second at sea level (See altitude definition for modified constants for high altitudes where air weight is lower.)

A 10-inch-diameter, 9-inch-pitch propeller turning at 12,000 rpm would have a thrust/second of:

102 x 9 x 12,000 x .000011127 = 120 ounces/second

Knowing the model’s weight and the thrust/second, it is possible to determine the thrust-to-weight ratio (TWR), measured in percentage. A 92-ounce model (my Swift) with a thrust of 120 ounces/second has a TWR of:

120 x 100 ÷ 92 = 130%


Figure 1


Figure 1 estimates the model’s speed using the propeller’s nominal pitch and rpm. The TWRs are calculated for 14 models’ performances I have observed many times.

It was concluded empirically that the TWR is proportional to the angle of climb the model can sustain indefinitely. See Table 2.

ClassTWRPerformances
Expert110% and upSustained vertical climb, high maneuverability
Intermediate85 to 110%Sustained steep climb, good maneuverability
Trainer65 to 85%Modest climb, low maneuverability
Glow-Powered Glider25 to 65%Shallow climb, poor maneuverability
Table 2

TWR percentages are a more accurate appraisal than PL because engines with the same CID but different manufacturers are not equally powerful.

If you have an engine and are seeking a model for it to power, the TWR may be used. Assuming a thrust of 134 ounces/second:

TWRModel Weight (Ounces)
125%107
100%134
75%178
50%268

The formula is:

Thrust/Second ÷ TWR = Model Weight

That torque should be used for propeller selection. Consider the MDS .46 engine. Table 3 tells the story.

Propeller
(Diameter x Pitch)
rpmThrust
(ounce/second)
Model Speed
(mph)
TWR
(100-ounce model)
Max Torque10 x 910,710107110107%
Max Horsepower9 x 418,000658065%
Table 3. This presents solid proof that choosing a propeller diameter and pitch that loads the engine to peak torque rpm is superior to loading it to peak horsepower rpm.

Propeller Selection: The objective is to select a propeller with a diameter and pitch that loads the engine to or close to its peak torque and propels the model, in level flight, at the preselected speed. The procedure is different in each of the three engine groups I listed previously.

Group 1) Brake horsepower, torque curves, and rpm table available.


Gas-powered engines are simple to run. This 2.4 cu. in. Fox typically turns a 20 x 10 propeller.


Refer to Figure 2 a and b. Propeller selection is easy. The maximum torque is 10,500 rpm. The rpm table shows that a 12 x 8 APC propeller turns at 10,500 rpm.

However, at 8-inch pitch and 10,500 rpm, Figure 1 indicates a speed of 95 mph. This is too fast for our pilot; he or she wants 70 mph.

Referring to Figure 1 again, a 6-inch pitch at 10,500 rpm gives 70 mph.


Figure 4


To determine the propeller diameter with a 6-inch pitch that will provide the same load as the 12 x 8, see Figure 4. It is based on Dave Gierke’s Propeller Load Factor (PLF) of Diameter2 x Pitch = PLF.

Applying this to the 12 x 8 propeller produces a PLF of 1,152. For the 14 x 6 the PLF is 1,176, which is close enough for all practical purposes.

If the expert pilot requires a higher speed than 95 mph, he or she will follow the same procedure, but select a higher pitch, at the same rpm (10,500) that will give the required speed and use the formula to obtain diameter.

Group 2) Only rpm table available.


Maximum rpm from an engine isn’t always practical; that demand could cause serious damage over a long period.


Refer to Figure 2b: the table of rpm for a .61 engine, calculated thrust, and speed. The 12 x 8 gives the most thrust, but notice how close the others are in thrust and note the speeds. For our pilot who wants 70 mph, proceed as in Group 1 to obtain pitch + diameter with a PLF that is close to that of the 12 x 8 propeller.

Group 3: No published review.

Unless you have a friend, with the same engine, who can be persuaded to develop an rpm table (Figure 2b) for suitable propellers, the only thing to do is obtain the engine and bench-test it to develop an rpm table specifically for that engine—after carefully breaking in the new engine.


An aerobatic model has a wide performance range. The optimal propeller for slow-speed 3-D isn’t necessarily the right propeller for precision flight.


Then proceed as for Group 2, calculate thrust/second, and estimate speed from Figure 1. Select the propeller that produces the highest thrust. It will be close to the engine’s peak torque. Modify the diameter and pitch to obtain the selected level flight speed, as detailed in Group 1.

Information Sources: To assist the beginner in the selection process, following are sources of information.

• Engine, kit, or ARF reviews in model aviation magazines.
• Catalogs from distributors such as Tower Hobbies. They contain a wealth of information about models, engines, propellers, and hundreds of accessories.
• Dave Gierke’s thorough and comprehensive engine evaluations published in Model Airplane News: “.40 Engine Shoot Out” in the March 2001 issue and “We Test 10 .60 Engines” in the May 2003 issue.


A 60-size model will often fly as well with two .25 engines (less displacement).


Thanks to friend and fellow author Dave Gierke; his work made a major contribution to this article.

Happy Landings!

-A.G. Lennon
487 Oakville Rd.
Dollard-des-Ormeaux
Quebec, Canada
H9G-1M1


The Rolling Workstation Project

$
0
0


Written by Tim Soukup
A great project starts with a great foundation
How To Do It
As seen in the January 2011 issue of
Model Aviation.


The Breakdown

Work Surface: This is a sheet of 5/8 or 3/4 MDF trimmed to 4 x 6. You can buy it last, when the construction is almost complete. The last operation is to fasten the top surface.

MDF requires no paint or finishing, but I painted mine and then applied a coat of polyurethane. When it gets old, scarred, and stained, simply unscrew this surface, flip it over, and reattach it. Then you have a fresh top.

I learned that MDF is sold in 49 x 97-inch sheets, so it’s 1 inch larger than necessary all around. Have it trimmed for you at the time of purchase.

You also need two sheets of 3/4 birch (five ply) plywood, trimmed to 44 x 68 inches. These pieces are 2 inches undersized all around (not 48 x 72 inches).

That is so that the MDF top will leave you with a 2-inch lip on every side. If your finished bench has no overhang, you can’t clamp anything to it.

Compartment Walls and Drawer Frames: Two or three sheets of 1/2 birch plywood trimmed to 36 x 96 inches are required. I used the better part of three sheets.

Also get 12 straight, high-quality 2 x 4s, untrimmed. You won’t need them all, but you will probably make a mistake or two cutting them at home during construction. I did. It’s best to have a few spares to save you a trip to the store.

Two straight 4 x 4s, 8 feet long, will be cut to exactly 36 inches and used as corner supports. Check these for straightness. I cut mine a tiny bit long and then made a series of trimming cuts, to ensure that the final length was correct.


This is where dreams begin. A wide-open building surface cries for a project.


Casters (Optional): These 4-inch casters stand 5.25 inches tall. I obtained mine locally, at Northern Tool and Equipment for $11 each (part number 189341). The picture in the online catalog is incorrect.

The casters I purchased came with the bare minimum amount of grease in the bearings. I used a grease gun to inject a bit more.

Estimated Materials Cost:
Four or five plywood sheets (the good stuff): $140-$180
One sheet of 5/8 MDF: $25
12 8-foot 2 x 4s: $30
Two 4 x 4s (cut into 36-inch sections): $24
Four caster wheels: $44
One set of slides per drawer at $5 per set (optional): $50
One 4 x 8 sheet of 1/4 hardboard (optional): $12
Five boxes of coarse-thread drywall screws: $25 (Two boxes of 3-inch, two boxes of 2-inch, 1 box of 15/8)
Eight steel corner brackets at $5.50 each: $36
One gallon Min-Wax polyurethane (optional): $29
One gallon mineral spirits (optional): $12
Total: $494 ($364 without drawers)


A rolling workstation offers its user not only four vantage points for whatever is being built, but also four storage options.


Many of us build and repair our models without taking our work areas into consideration. After all, it’s our domain, right? Tools and tables are our environment. We should make this a higher priority in our pursuit of the hobby.

How many times have you wished that you had a better work area or more room to work? I can’t tell you how many times those thoughts have occurred to me in the past 30-plus years. I have been involved in this hobby/sport since I was 8. Growing up, I built on whatever was available—a Ping- Pong table in my parents’ garage, a card table, or whatever I had access to.

These days I feel fortunate to have a two-car garage that doubles as my shop. Sure, I’d like to have a dedicated standalone shop, but we work within our means.

If you live in an apartment or a condo, your workstation abilities are probably more constrained.


The tabletop is 44 inches from the floor, which is good for the average-height person to work on a model up to 1.20 size. Giant-scale builders might want a shorter bench.


For a long time I used two 24- x 96-inch workbenches with drawers and storage underneath. However, they were flush against the wall and limited accessibility. In addition, while working I frequently lose small items that are mysteriously attracted to the crevice between the workbench and the wall.

My preferred workspace is an “island.” Although I don’t claim that the project I’m presenting is the do all/end all/be all of workstations, it serves my purposes much better than what I had been using. Even those who assemble ARFs can appreciate a straight working surface.

I “make do” with standard tools, and I think you can too. If you have questions at some point, ask someone. Don’t guess; that might cost you time and money.

I am fortunate in that a couple of my friends make cabinets and are master woodworkers. Nothing smells better than freshly cut pine, cedar, or oak.

As I have mentioned, aeromodelers’ building needs differ depending on task, location, and other factors. The intent of this article is to help develop your own space through the construction story of my rolling workstation.


Drawers on rollers use hardware scavenged from an old computer desk. Everything is attached with screws, including galvanized corner brackets.


This structure consists of a generous worktop that measures 4 x 6 feet, several compartments for storage, and a good number of drawers. It also features a sidemounted electrical power strip with six outlets and sits on four sturdy casters so I can move it around or out of the way as the situation dictates. Mobility is what makes this workbench multifunctional.

Getting Started: We aeromodelers have unique building needs and requirements, and the solutions can be as varied as we are. For this project you can use your own dimensions or the ones that I provide. I have changed facets of this workstation even while building using my new setup.

Before I began, I browsed the Internet for free plans for a workspace similar to this. The searches I conducted turned up probably 2 million results.

I formulated my design by gleaning information and ideas from approximately two dozen articles. I also incorporated a number of considerations that Bob Hunt addressed in the March and May 2010 MAs.

From that point I went to a clean sheet of graph paper. Don’t start cutting up good lumber and driving screws without a plan.

I sketched several simple dimensions and the overall layout. Then I went into my shop and measured all the tools that I wanted to incorporate into the design, wrote all of the dimensions on a small pad, and then began designing.


Tim measured his popular tools and supplies, and then made custom storage spaces to fit them. He finished all wood parts with several coats of Min-Wax before assembly.


I created the station to offer a generous and sturdy work surface and plenty of storage below. I made sure that I fabricated cubicles that were adequate sizes to store all of my most often-used tools.

Nothing is worse than having a space that is 1/2 inch too narrow or 1/4 inch too short in which to store an item. If you choose to make individualized spaces for your tools, don’t guess the dimensions; be sure of their required spaces.

Keep in mind the thickness of the materials you are using. If you planned to employ 1/2 plywood but then purchased 5/8 or 3/4, you are going to run into problems.

I went to the local home-improvement store with my notepad. I made notes about what materials were available and their associated costs.'


The tabletop is two layers of heavy plywood the size of the station frame. On top of that the author screwed on a painted layer of MDF that is 2 inches wider all around.


You could purchase precut workbench kits and then modify them to accept wheels, but those setups are made to sit flat on the floor. If they are constructed from particleboard, they probably warp and sag as time passes unless you mount them atop a level, sturdy frame.

The precut structures might be more suitable for you, but you won’t have the option of custom-sizing cabinets or storage compartments. My workstation has no wasted space.

After my home-improvement-center field trip, I knew that the cost would be close to $400 for wood, hardware, and the Min-Wax polyurethane finish that I would need.

Materials: As I was browsing at the store, I noticed that there are considerable variations in materials and their costs. I encourage you to spend the extra money on good-quality products.


Four-inch casters support the full weight of the workbench, with duty to spare. The station can easily be relocated in the garage, to make space for a car in the winter.


I remember the day I learned about “contest balsa.” It made the models I built fly considerably better than regular balsa did, and they were definitely lighter in weight. They also cost slightly more. That’s also when I realized that most “bargain” wood really wasn’t.

You have a choice to make; will this workstation be stationary or mobile? If it is going to sit in one spot, almost any sort of plywood or premade cabinets will do for a base. It’s the top that will need to be the most accurate. I chose to make my structure mobile, so it was going to have to be much more robust.

I purchased an extremely high grade of materials; I was building this workstation to last a long time.

Don’t waste your time building the frame from particleboard or OSB (oriented strand board); they look like chipboard or thin wood wafers pressed and glued together. These materials are too weak, and the result will not look like a carefully crafted workpiece. It might appear to be a crate when you’re shooting for a cabinet.

As you select your lumber, make sure it’s straight. Warped 2 x 4s will yield a similarly twisted product.

Check for knotholes, and look at all four sides of each piece of wood. A few little (dime size) knotholes aren’t bad, but the fewer the better.


The basic frame of Tim’s bench is hand-picked 4 x 4 posts and 2 x 4 spreaders. Sealing the material is important to minimize seasonal expansion.


Sight down each edge of the wood and look for obvious warps. I saw some pieces that would have made great propellers! I’ll bet that I culled through 120-140 pieces to select the 12 I bought.

I purchased 8-foot (96 inch) 2 x 4s. For this project, the longest needed to be 68 inches. I found a few pieces that were straight and had great grain, but one end was bad. That was fine, because those lengths were trimmed during construction and the flaws presented no problems.

While you are at the home store, ask to see the high-quality plywood. I chose some presanded 1/2 and 3/4 birch. It is a step or two better than construction-grade plywood—but not furniture grade—and both sides have a beautifully sanded finish. Check both sides for blemishes, and examine edges and corners for damage.

Take notes while you are shopping. Even write down item names, prices, and SKU (stock-keeping unit) numbers so you don’t get confused later.

You’ll need to have the plywood cut to size. Many home-improvement stores have fixtures that will slice plywood almost straight.

Mark your material, and then have an attendant make the long cuts on a saw fixture. Since I planned for my bench to be 4 x 6 feet, a standard sheet of plywood needed to be trimmed. Keep the scraps.


Corner posts are notched as shown. Angle aluminum cut to size supports the sliding shelf. Notice the wood grain; the author made some excellent material choices.


I bought four 6-inch-diameter swiveling casters but returned them after a test installation and obtained the 4-inch size. The 6-inch wheels would have been too tall. By fitting 4-inch wheels, the tabletop was 44 inches from the floor.

At least two of the four casters must be able pivot so you can maneuver your workstation into different locations. If they don’t spin, you’ve built a 500-pound speed dolly.

The wheels I used are rated at 550 pounds of capacity each. I didn’t want to overload a less capable wheel, nor did I relish the thought of a wheel failing someday when I’m moving my workstation around the shop.

Assembly: Rather than provide a step-by-step progression through this project, I’ll hit only the fine points. You already know that you need to make accurate cuts.

I used two rechargeable drills for the assembly process; one had a bit installed and the other had a Phillipshead driver. That way I could drill with one and drive in screws using the other.


Tools that are used most often are kept in a cubby that is easy to access. Design your workbench to suit your needs. Fill empty spaces with drawers instead of shelves.


Remember that a 2 x 4 piece of wood is actually 1.5 inches by 3.5 inches. A 4 x 4 is actually 3.5 inches square—not 4. Allow for these dimensions if you design your own structure or work from a sketch. Use as many squaring devices as you can. Triangles and squares aren’t solely for aligning wings, rudders, and stabilizers.

This project isn’t simply a table with wheels. It needs to accommodate a lot of equipment stored in various places, which adds substantial weight to the final product.

I don’t want to find two years from now that the entire table is swaybacked like an old mare; there’s nothing I can do about it at that point. I want it to stay flat.

If you don’t plan on storing heavy power tools in your workbench, it probably doesn’t have to be as substantial as mine is.

A few framed cubicles made from 1/2 plywood and plastic tubs would be fine.

Doors are a nice touch too. I began by constructing the basic box frame. Then I stained, sanded, and sealed it with two or three coats of polyurethane. I chose this sequence because it was easier to manipulate the frame and turn it over to apply the finish while the structure was still mostly unbuilt.


The frame supports the work surface in several places, to prevent sagging. You can build your workstation from a plan or start with a frame and fill it in.


I finished approximately 95% of the structure and plywood panels (while they were still large sheets) with polyurethane before final assembly. If you wait until you’re finished assembling the workstation to apply the finish, you’ll find that your structure has gained considerable mass.

This method provided me with a surface that was 99% free of runs and drips. I didn’t relish the thought of having to get on my hands and knees to stain inside all of the little crevices and sand them between coats. This was by far the easiest but most time-consuming (taking into account drying time between coats) portion of the project.

I applied finish to one side of the plywood sheeting all the way to its completion. When I was satisfied with the result, I finished the other side. This way I didn’t have to keep track of how many coats I had given each side.

From start to completion, this finishing process took slightly more than three weeks. If you omit a painted finish, you can probably build your workstation in a three-day weekend. If you omit the plans, you can build it in maybe four hours.

If you put forth enough time and don’t rush, you’ll have a fine workstation. I’m guessing that the total amount of time that I invested was close to 100 hours.

Do you remember those 1/2 plywood sheets you had the store cut to 36 x 96 inches? They are going to make all of the inner supports and cabinetry. Thirty-six inches is exactly the spacing between the plywood top and bottom.

As I mentioned, the complete workstation, sitting on its wheels, will be 44 inches from the floor to the surface of the medium-density fiberboard (MDF) top. I’m tall, and I appreciate being able to work on my models without having to stoop over.

I framed the box structure on the garage floor. When I was satisfied that all was square, I fastened the bottom plywood using 3-inch screws and then flipped the entire structure right-side up to complete the cabinets.


There’s enough room to build several models on the author’s rolling workstation. Its bright-blue finish is excellent for photos and easy on the user’s eyes.


Install all inner walls and interior post supports before you add the top piece of plywood (predrilled) and MDF top. It’s easier to install the drawers and their associated hardware and the slide-out tables with the top off. It would only be in the way at this point.

A smaller (and simpler) workstation certainly won’t require this amount of preparation.

Whether or not you opt for drawers is up to you. I suggest that you have all slide hardware in hand, and follow the manufacturer’s recommendations when you build the drawers. That will affect the dimensions of each drawer and depends on whether you choose side- or bottom-mount slides. Each type has its own mounting method.

My workstation has a total of 11 drawers.

I recently got rid of an old computer desk, but before it went out to the curb I scavenged all of the slide hardware from it. I got three free slides from that.

So I went a bit overbudget. The price will change depending on who’s listening to you tell the story and the dimensions of your finished project. But I’ve got one sturdy workstation, though, and I can even roll it outside if I want.

Watch those saw blades and count your fingers. Good luck!

-Tim Soukup
trsoukup1@yahoo.com


Tower Hobbies Uproar V2 .46 GP/EP ARF

$
0
0


Written by Fitz Walker
Aerobatics on a budget
Product review
As seen in the October 2017 issue of
Model Aviation.


Bonus Video


Specifications

Model type: Sport aerobatic
Skill level: Intermediate to advanced
Wingspan: 47.6 inches
Wing area: 630.8 square inches
Length: 48.1 inches
Wing loading: 16 to 17 ounces per square foot
Weight: 74.5 ounces
Power system: .46-cubic-inch two-stroke or ElectriFly RimFire .32 brushless electric
Radio: Four to five channels required
Construction: Balsa/plywood
Price: $99.99


Test-Model Details

Motor used: ElectriFly RimFire .32 brushless outrunner
Speed controller: Castle Edge Lite 75
Battery: FlightPower 4S 4,350 mAh LiPo
Propeller: APC 13 x 8E
Radio system: Futaba T8J transmitter; Futaba R2006GS six-channel receiver
Servos: Four Tactic TSX20
Ready to fly weight: 62 ounces
Flight duration: 6 to 10 minutes


Pluses

• Well built and easy to assemble.
• Easy to fly with a wide flight envelope.
• Accepts multiple powerplants.


Minus

• Low-rate rudder not very effective.


Product Review

Fun-fly models have been a staple of RC modelers and RC clubs for many decades. Although they would not likely win any awards for looks, they are often in a class all to themselves with a focus on excellent flying qualities, simplicity, and durability. They are no-frills airplanes designed to perform exceptionally well in the air.

The Tower Hobbies original Uproar was introduced more than 20 years ago, and it seems that the company decided it was time to upgrade its venerable design for the modern era in the form of the Uproar V2. This revision is a step up in performance, in addition to accepting both electric- and glow-power systems right out of the box.

Notable changes from the original Uproar to the V2 include:

• Longer tail and nose moment.
• All control surfaces resized.
• Different aileron planform to help both roll authority and high-alpha stability.
• Different wing airfoil for improved aerobatics.
• Tip plates, plus a taller canopy to help knife-edge performance and help ailerons work through stall speeds.
• Plug-in wing panels rather than a one-piece airplane.
• Hatches on the top and bottom for equipment and battery access.


Construction

Like its predecessor, the new Uproar V2 is an all-wood ARF, factory covered with iron-on Oracover film. I didn’t notice any wrinkles in the model I received and the build quality looked good, with no noticeable defects.

The Uproar V2 doesn’t have a lot of pieces, so construction is relatively quick. All of the control surfaces are preslotted from the factory for the included CA hinges.


The Tower Hobbies Uproar V2 has only a few major subassemblies and abundant hardware.


Construction starts with cutting the wing covering away to reveal the aileron servo mounts. These mounts are designed for mini servos, but if you want to use standard-size servos, there is plenty of space to trim the openings for them.

With such a big, thick-wing airfoil, it is easy to reach in and grab the servo leads without needing a pull-string guide through the wing. Clevis hardware is quite stout with a screw pin that looks unlikely to ever break off of the control horn. The servo side of the linkage utilizes a simple 90° bend and a snap-on keeper.

After removing a cleverly hidden balsa tail filler block, the tail fins slide in, are aligned with the wing, and finally glued into place with epoxy. All of the parts fit into place wonderfully and aligned so well that I did not need to shim the tail to match the wing. Instead of a crossbar, the elevator halves use individual pushrod linkages. This nice, easily adjustable setup prevents misalignment of the elevator halves under load while flying.


CA hinges are installed at the factory and only need to be glued. Note the metal wing mounting plate.


After mounting the elevator and rudder servos, it was on to the business end of the model. If you choose to use a glow engine, the firewall is fuelproofed at the factory. Both the 6-ounce fuel tank and engine mount are included in the kit.

Because I will be flying the electric version, I used the conveniently marked holes to drill and install the M3 blind nuts into the firewall. These holes lined up perfectly with the RimFire .32’s rear X mount. Mounting the APC 13 x 8 propeller required trimming the spinner slightly, although this is common for high-pitch electric propellers.

The battery/fuel tank platform is removable via four screws and allows easy servicing. After smearing a thin layer of epoxy onto the platform, I attached a strip of Velcro to mount the FlightPower 4S battery.


There is ample room in the front for a large 4S LiPo battery.


In the back of the manual is a drill template for mounting the main landing gear, which I found extremely helpful for locating and installing the undercarriage. The tail wheel is also nice because it is spring loaded, and the mount uses brackets to attach to the lower portion of the rudder.

Installing the canopy is probably the most time consuming, although that is like saying the most time-consuming part of putting on your shoes is tying the laces. You will need to trim the vacuum-formed plastic in a two-step process then glue it to the fuselage with canopy glue.

A special note should be made regarding the livery. Two huge sheets of peel-and-stick decals are supplied and the individual prints need to be cut out by hand. A nice touch is that detailed instructions and even placement measurements are printed on the decal sheets. This is the first time I’ve seen such attention paid to decal placement and it was a welcome addition.


Hatches in both the top and bottom of the fuselage allow easy access to the interior.


Flying

Assembly at the field is quick. Each wing panel is secured with a single hex-head screw clamping down on a metal plate extending from the wing. All of this is accessed via the lower hatch.

The manual lists three control rates for all surfaces: low, high, and 3-D. I set up my transmitter for all three rates (except for the elevator, for which I used only high and 3-D).

At full tick, the RimFire .32 pulls 53 amps for roughly 760 watts of power. All of that power is not needed because the Uproar V2 leaped off of the ground before I could even advance to full power. This airplane wants to fly, and fly it does. It might actually be allergic to the ground.

The recommended CG felt comfortable and the model was stable in all flight attitudes. Cycling through the different control rates, I thought the high rates were great for general sport flying, while the low rates were mild and trainerlike. The 3-D rates were where the real fun began, but the aircraft definitely needed the recommended 50% to 60% exponential. I thought the rudder was too weak to be of much use for aerobatics at the low-rate setting, so I mostly kept it on the 3-D rate.

Landing the V2 is almost too easy. The airplane will fly very slowly. Even if there is a slight breeze, expect to be able to land it nearly vertically. I think the wheels might be mostly for show because it barely needs them for either takeoff or landing. If you are easy on the throttle, you will be rewarded with long flight times.


Aerobatics

The V2 Uproar certainly puts the “fun” in fun flying. This is a great, neutrally stable airframe that is comfortable doing nearly anything you could want to do with it. Rolls are axial and loops are easy with no tendency to snap under aggressive movement.

Knife-edge flight requires a bit of speed to fly level, but it exhibited little cross coupling. Inverted flight is as easy as upright. Snap rolls were good after I increased the rudder throw to nearly the physical limits.

Positive roll control is maintained no matter how slowly you fly and the roll rate with the ailerons on the 3-D setting is quite fast. Although the V2 Uproar is not technically a 3-D airframe, with the throws cranked up, it can do basic 3-D flying. Even with my limited 3-D skills, I could hover it.


The recommended electric motor setup has an abundance of power with out-of-sight vertical performance.


Its performance with the RimFire .32 motor is exceptional, with unlimited vertical climb. It is not an intimidating airplane to fly. I could easily see this model as a good second or third aircraft after one tires of his or her trainer.

Because the side-force generators (wingtip plates) are simply screwed on and hence optional, I wanted to compare flight characteristics with them installed. With the winglets on, I could land slower and perform better knife-edge flying. With the winglets off, the rolls seemed crisper and vertical performance was slightly better (likely because of the weight difference). Other than that, I didn’t notice any major changes to the flight characteristics.


Final Thoughts

The V2 is a remarkable airplane that, on low rates, is an easy and relaxing model to fly. With the throws cranked up, it is 3-D capable. It builds quickly and is well designed and built. Removable wings allow the V2 to fit in the most compact of vehicles, and a choice of wet or dry powerplants gives it diversity.

The Tower Hobbies Uproar V2 is suitable for a broad range of flying skills—a true fun-fly model.

—Fitz Walker
flying_fitz@yahoo.com


Manufacturer/Distributor:

Tower Hobbies
(217) 398-8970
www.towerhobbies.com


Sources:

Futaba
(217) 398-8970
www.futabarc.com

Castle Creations
(913) 390-6939
www.castlecreations.com


21-Cell Ammo Box Divider

$
0
0


New products that are Worth a Closer Look
Product spotlight
As seen in the August 2017 issue of
Model Aviation.


Safely storing LiPo batteries can be challenging, especially when you have several packs. One common storage method involves the use of ammunition cans; however, fitting several batteries inside the can might require some thought and possibly making dividers.

Mark Freeland of Retro RC has simplified the process by providing a line of laser-cut dividers made from Baltic Birch plywood. The large ammo can insert is capable of holding 21 battery packs! In the photo, the size of the packs ranges from two cell to four cell, and 1,500 mAh to 4,000 mAh.

The ammo containers can be purchased from many stores. The one used in the review came from Harbor Freight at a cost of $15.99 before the discount that can be found on the Harbor Freight ad located in this magazine.


The insert was quickly assembled and glued using CA adhesive. To prepare the ammo can, holes should be drilled in the top to allow any gases to escape if a battery were to ignite. Because the ammo cans are waterproof, venting is a must.

Blue painter’s tape was used to cover all of the metal surfaces inside of the can as an added precaution to ensure that none of the battery connectors or balance leads would make contact with exposed metal and arc.

In addition to the 21-cell divider for larger .50 caliber ammo cans, Retro RC has a 24-cell divider that also fits large cans, and a 16-cell divider can be purchased to work with a narrower ammo can, providing a great option for those with smaller batteries.

The ammo can and divider has provided an easy way to transport and store batteries, while taking up much less space. Mark has developed a simple, innovative product that should be of interest to anyone who has multiple batteries. The dividers sell for $15.98, $25.98, and $29.98; pricing is based on size.

Retro RC: Box 193 Keego Harbor MI 48320; Tel.: (248) 212-9666; website: www.retrorc.us.com


Purchase plans for the AH-56 Cheyenne (AMA Members)

$
0
0


AH-56 Cheyenne: Plan #1059

Click the button below to purchase this plan.
(Your transaction will be processed securely with PayPal.)

A shipping fee will be applied at checkout.
You will have the opportunity to review your order, including shipping, before finalizing.


Quantity (second plan half off)


Purchase plans for the AH-56 Cheyenne (Non-AMA Members)

$
0
0


AH-56 Cheyenne: Plan #1059

Click the button below to purchase this plan.
(Your transaction will be processed securely with PayPal.)

A shipping fee will be applied at checkout.
You will have the opportunity to review your order, including shipping, before finalizing.


Quantity (second plan half off)


Purchase plans for the AH-56 Cheyenne (International)

$
0
0


AH-56 Cheyenne: Plan #1059

Click the button below to purchase this plan.
(Your transaction will be processed securely with PayPal.)

A shipping fee will be applied at checkout.
You will have the opportunity to review your order, including shipping, before finalizing.


A Partnership in Flight

$
0
0


Written by Dick Tonan
Beechcraft Heritage Museum and local clubs work together to promote flying
Our community
As seen in the July 2012 issue of
Model Aviation.


A full-scale aircraft museum and an association of model airplane clubs have found a way to team up and promote aviation.

The Middle Tennessee R/C Clubs Association (MTRCCA) is an AMA chapter that was formed six years ago, and its members come from five middle-Tennessee AMA chartered clubs. This association aims to promote fellowship among clubs in the middle Tennessee region, pool the resources of the member clubs to support large events, and encourage model aviation.


Scott Harris proudly displays his world-class F-16, which was featured on the cover of the August 2011 issue of MA.


The Beechcraft Heritage Museum, located in Tullahoma, Tennessee, showcases the history of the Beechcraft family of airplanes. It is committed to promoting aviation education and preserving the heritage of Beechcraft airplanes. It was incorporated under the auspices of the Staggerwing Club. The association and the museum have found a way to work together and support one another.

The MTRCCA holds three annual events, one of which is its annual RC air show. For a variety of reasons—including that the air show had outgrown its venue—the association board members decided that a new site was needed for the October 1, 2011, event. Association members and officials with the Tullahoma Airport Authority (TAA) began discussing the possibility of holding the event at Tullahoma Municipal Airport.


Lonnie Johnson displays his exquisite AMR Waco YMF-5.


The association is a chapter of the national AMA organization, which was a key factor in garnering approval. Also, the group assured the TAA that it had the experience and means to operate in a safe manner that would not interfere with airport operations.

During these discussions, MTRCCA members met the museum’s curator, Wade McNabb. (The museum is located adjacent to the airport.) It was quickly realized that the association and the museum shared several common goals— namely promoting aviation to the public, especially youth. Model aviation is a great way to do this. As a result, MTRCCA and Beechcraft officials decided to collaborate on the air show, as well as museum events.


The incredible craftsmanship can be seen in this bare-bones version of the Beechcraft Staggerwing.


The airport proved to be an outstanding flying site for the premier air show in October, and it had the added benefit of being close to the museum—making the event more than just a typical fly-in.

Saturday evening, there was a catered dinner at the museum’s first-class facility. Tables covered with white linen were set up in a hangar and were surrounded by classic Beechcraft aircraft, including the first Beechcraft: a Model 17 Staggerwing, the original Travel Air Mystery Ship, and a host of Model 18 Twin Beeches. What a great setting for a dinner for a group of aviation enthusiasts!


This is the first Beechcraft: the 1932 Model 17 Staggerwing.


To further enhance the evening, The Red Wine Effect trio provided beautiful music during the dinner.

Following the dinner, Wade provided a guided tour of the museum. This alone was worth the price of admission! Wade’s knowledge of the extensive collection and history of the various aircraft brought them to life. This tour wrapped up the air show. However, there was more in store for the partnership.


The museum’s rare Baron Model 2000A Starship. Only nine are actively registered with the FAA.


On Monday, October 3, the museum hosted its semi-annual Scot Perry Air Academy. Throughout the three-day period, the museum provided local youth the opportunity to visit the museum, where they were exposed to various aspects of aviation. This included working with model airplanes, model rockets, and hot air balloons. This is where the MTRCCA stepped in.

Association board members viewed this as a good opportunity to expose youth to aviation and RC modeling. Several association members returned to the museum on Tuesday, October 4, with four RC trainer aircraft. During the course of the day, they conducted introductory flights for the 18 youngsters attending the academy.


In addition to the fine food and classic aircraft, pilots were treated to the wonderful music of The Red Wine Effect.


It was a rewarding experience, and at the end of the three days, the participants ranked the introductory flights as the highlight of the academy.

A couple of weeks after the association air show, the museum hosted its annual Beech Party Fly-In. Pilots from across the country descended on the Tullahoma airport, flying their vintage and modern Beechcraft aircraft. In a quid pro quo agreement, the association arranged to support this museum event. The question was how.


After a hard day of flying, the pilots enjoyed a catered dinner surrounded by two Beech Model 18 aircraft and a Travel Air Mystery Ship.


Association members decided on a static display of a range of RC aircraft—from small electrics to a 50% Ultimate Biplane. The display also included turbine-powered models and RC helicopters.


A view of the Saturday morning flightline; it was clear, but cold!


A group of association members, known as the Dog House Flyers, provided some of the models and set up flight simulators with two 55-inch plasma television monitors. This was a hit. The kids and the full-scale pilots enjoyed it. There was a line of people all day patiently waiting for a turn.

MTRCCA had intended to put on several fl ight demos, but was limited to only two late in the day. The full-scale pilots were having too much fun doing low passes down the runway with their Staggerwings, Twin Beeches, Bonanzas, and Barons.


Classic aircraft, fast cars, and RC model aircraft … does it get any better than this?


During the course of the event, association members spoke with many museum members. A common theme became apparent. How do we get today’s youth interested in aviation? This is the same discussion that takes place at AMA Headquarters in Muncie, Indiana, and among local clubs.

As a result, several association members met with Wade McNabb to discuss the issue and determine what steps can be taken to achieve this goal. During the threehour meeting, a number of ideas were tossed around, most of which focused on the museum-sponsored Air Academy.


The youngsters who participated in the museum-sponsored Scot Perry Air Academy learn about RC models.


Both groups continue to meet to turn these ideas into actions. MTRCCA members are optimistic that by pooling the resources of the association with the Beechcraft Heritage Museum, they can make a difference.

—Dick Tonan
dtonan@mac.com


Sources:

Middle Tennessee Radio Control Clubs Association
www.mtrcca.org

Beechcraft Heritage Museum
www.beechcraftheritagemuseum.org


The Modern Control Line Scale Model

$
0
0


Written by Fred Cronenwett
Benefits of RC integration
Technical
As seen in the June 2015 issue of
Model Aviation.


Editor's note: Control-line scale competition continues to evolve. In 2017, the first stand-alone Control-line Scale rule book was released with input from a new contest board and made changes to improve the competitive environment. You can find official Control-line Scale rules at https://www.modelaircraft.org/files/ControlLineScale2017-2018.pdf.

One of the plans I have in my collection is from the Modern Hobbycraft Products line and is dated 1946. These Control Line (CL) Scale plans show a Bantam ignition engine and a 28-inch wingspan model. The aircraft was so small that there was barely enough room for the engine and a small bellcrank. By 1947, the glow engine had made its appearance, making ignition engines obsolete.

In 1961, RC proportional controls were introduced, making reed systems outmoded. Then engine manufacturers figured out how to make the glow engine with throttle control. By 1964, larger engines were available, making it possible to fly larger models. So you may ask, “What does all of this have to do with CL Scale?”

CL Scale pilots began using these newer throttled engines with a three-line handle and bellcrank, but fitting an engine, fuel tank, and a three-line bellcrank into a small model proved to be difficult, so designers started making larger models. Even in the 1960s, the technology was changing the CL models that we fly today.

CL Scale is all about making a scale model that flies like the full-scale aircraft. Today’s typical models are limited to throttle only, and most do not have retractable landing gear or flaps.


These Great Planes Combat ARF models were converted to CL Scale and use a Tactic 2.4 GHz radio for throttle control. The P-40 has iron-on film covering and electric power. The Spitfire (top) uses a traditional glow-fuel-powered engine.


What if you wanted to build a P-51 Mustang that could retract its landing gear, lower the flaps, and then maybe drop some bombs? This required several mechanical linkages and adding additional lines. What if I told you that you could build that model, install a simple two-line bellcrank, and have full control of these features?

The question is how to make these features work and what controls are at the handle to make them work. For some, electric would be the power system of choice. This is often used in RC models.

This article will discuss how to build for CL Scale by taking advantage of items that weren’t designed for CL. You can build for fun and never enter a competition, or build a serious scale model with the intention of entering a CL Scale competition.

The growth of items designed for other events has dramatically changed CL Scale. A variety of retractable landing gear, servos, electronics, 2.4 GHz transmitters, electric power, four-stroke engines, sound modules, navigation and landing lights, and other items has made it possible to do things in CL Scale that were never done before.


The author’s scratch-built Profile Scale B-29 has electric power and 2.4 GHz controls for the throttle. The 96-inch wingspan model weighs 13 pounds.


In the 1960s, CL Scale pilots took advantage of new technology and are now at another crossroad with electric power, electric retracts, and 2.4 GHz radio control. Using 2.4 GHz for the throttle and other features was approved for CL Scale and CL Navy Carrier in 2013. The elevator must be controlled by a bellcrank and mechanical pushrod, but all other features can be controlled by 2.4 GHz.


This shows some of the details you will need for Authentic Scale. The judges will look at the cockpit, surface details, and colors.


Getting Started in CL Scale

When starting a scale model, choose an aircraft that has a special meaning. The big question is what size of model you want to build. Models are traditionally built without a removable wing and generally have wingspans of 55 inches or smaller. If the wing can be removed for transportation, the model can be built larger and still fit in a car.

I like to keep my models’ weight between 3 and 15 pounds. The weight limit for competition is 20 pounds. Models with a 40-inch wingspan (3 to 4 pounds) will generally have small wing areas and will be limited to throttle only. If you build a model with a 55-inch wingspan (6 to 7 pounds), the wing area can carry more hardware, such as retracts and flaps, without problems.

If you are building a model with a 65-inch wingspan, it can carry even more hardware and have plenty of room for details. Models with a wingspan larger than 75 inches are more difficult to assemble and transport to the flying field, but have no problems carrying hardware to control the flaps, retracts, and other features. Smaller models are easier to handle at the field, but larger ones tend to fly better.


This shows the evolution of throttle control systems: a three-line handle and bellcrank, servo driver, a Bill Young handle, a converted RC car 2.4 GHz controller, and a standard 2.4 GHz RC transmitter.


I like to build CL Scale models in the 55- to 70-inch range for competition. Larger models penetrate the wind better compared with smaller models.

If you have ever looked for a CL Scale kit and couldn’t find one, it’s probably because there are few available today. Because of this, pilots have been converting RC plans, kits, and ARFs to CL models for many years. If it has wings, weighs less than 20 pounds, and requires a 1.25 cubic inch or smaller engine, it can be flown in CL Scale competition. An ARF can be flown in CL Fun Scale or Team Scale because neither event has a Builder-of-the-Model rule. All other CL Scale events require that the pilot build the model.

If the model will be flown for sport, it can be built from an ARF, kit, or plans and the scale markings do not need to be accurate. I use this type of model for practice and general flying at club events.

In CL Scale competition, part of the score is based on the static score. The judges compare the model to the modeler-provided scale documentation and determine how well the aircraft matches the full-scale airplane. Scale documentation contains the following: three-view drawings, color information, markings, photographs, and general information about the aircraft.


Dave Platt took the internal parts from an RC car’s 2.4 GHz system and put them into a custom-made handle for CL Scale.


A key feature is the airplane’s outline. The three-view drawing shows the correct outline, and any deviation by the scale model will result in a lower static score.
In Sport Scale, the modeler is allowed eight pages of documentation, so it has to be well organized and not confusing to the judges. The layout of the scale documentation is critical in getting a good score. Only provide the information the judges need to compare the model to the full-size aircraft.

Choose the three-view drawing you plan to use before you build. If the model is flown in competition, select the event in which you want to fly to determine how much scale documentation is needed and how much detail is required on the model. Fun Scale has the least amount of documentation and detail on the aircraft. Sport Scale requires more documentation, but the cockpit is not judged.


The lines with the handle are used with the 2.4 GHz controls, while the other set of lines has the connector that is required for down-the-lines electronic controls.


Profile Scale is the same as Sport Scale, except the fuselage and nacelles are 1-inch maximum thickness. There is also Team Scale, which is similar to Sport Scale.

A new event for 2015 is Authentic Scale, which demands extensive documentation. The model is judged up close and surface detail is expected. This is the only CL Scale event where the cockpit is judged and the judges can walk around the model and look at details up close.

When building a model for Authentic Scale, it is best to look at the full-scale subject in person, take the pictures, and document the color of the full-scale airplane.


A typical three-line bellcrank for throttle control is installed on Joe Eiben’s P-51. One pushrod controls the elevator, while another goes to the engine.


Throttle Control Systems

There are many choices, so select the level that you are comfortable with and have fun.

Regardless of which event you choose, throttle control is expected in CL Scale competition. There are many options for the throttle control system including the traditional three-line handle and bellcrank, which has been in use for more than 50 years. This is a mechanical system where the handle and bellcrank are matched with three lines and only control one function.

Electronic controls were developed in the 1970s using RC technology to transmit the signal down the insulated flying lines without a frequency. This popular method has been referred to as “down-the-lines” electronic controls.


Joe Eiben installed a 2.4 GHz receiver for the flaps and retract servo on his P-51 ARF that he flies for general sport flying. The throttle is controlled with a three-line bellcrank.


Before 2013, the CL Scale rules were specific: no radio frequency was allowed in CL Scale, but down-the-lines electronic controls could be used. This is why the variety of systems that used insulated lines, such as the single-channel Electronic CL handle, Clancy Arnold’s U/T system, and converted radios, were developed.

You can take an existing RC car transmitter and add a metal structure to attach flying lines. Modeler Dave Platt took all of the guts out of an RC car handle and made his own CL handle using those parts. Some modelers hold the RC car handle in their left hand and use the trigger to fly with a standard stunt handle with their right hand. Another option is to use a traditional RC transmitter clipped to a belt, with a standard stunt handle for the elevator.


The complete wiring for the receiver, battery, and retracts with the HobbyKing landing gear door sequencer are shown. The two servos would be used to open and close the gear doors.


Additional Options

CL Scale is all about mechanical or flight options that are performed during a competition flight. When researching your favorite aircraft, you will figure out which flight options can be used.

Retractable landing gear has been around for many years, but has recently gone through some major changes. Air-powered systems required a valve, air tank, servo, and retracts. Mechanical retracts involved a servo retracting the gear with a pushrod.

Electric retracts are now available and act like servos because they have an electric-powered jackscrew built into the retract unit and they plug directly into the receiver. Install the 2.4 GHz receiver, plug in the electric retracts, and you are done.

A P-51’s landing gear would need a servo for each gear door, gear door sequencer, and the electric retracts. Although setting up and installing this gear is still not easy, the number of linkages that were required in the past has been greatly reduced.

The gear door sequencer is an electronic device that plugs into the receiver and does all of the timing for the gear doors and retracts. Some aircraft, such as the B-17, don’t have gear doors and only require a receiver and electric retracts.

Flaps are easy to add with a standard servo and pushrod. I use the end-point adjustment on the RC transmitter to control the flaps’ up and down position. Servos can control other features such as the bomb bay doors and bomb drop.


Devices such as this landing gear door sequencer from HobbyKing are plugged in between the receiver, the door servos, and the retracts to control the the gear door operation sequence.


Take advantage of navigation, strobe, and landing lights by installing a simple wire harness and an electronic board that plugs into the 2.4 GHz receiver. It is controlled by a switch on the transmitter.

The LED lights are installed at the wingtips and controlled when the navigation lights are turned on and off. I recently purchased one of these units, and the deluxe version turns the navigation lights on and off by moving a toggle switch on the transmitter.

Flight options that can be used include touch-and-go, taxi, overshoot, and aerobatic maneuvers if the full-scale aircraft was capable of aerobatics. Duplicate how the full-scale aircraft was flown. This means a loop can only be flown if the full-scale airplane was capable of performing it.


The Great Planes Spitfire’s iron-on film was removed so wing fillets, radiators, and landing gear doors could be added. The model was then painted. The size of the cowl makes it difficult to install a glow engine.


Powering the Model

Now let’s discuss how to power the model. There are myriad choices of motors and engines available including two-stroke glow engines, four-stroke engines, electric motors, and turbine jet engines. Turbine jet engines have been used in CL Scale, but a builder would need to research this power system before considering that option. An AMA turbine waiver is also required.

A two-stroke, glow-powered engine is easy to use except for trying to hide the muffler. A four-stroke engine has a great sound and works well.

Electric power has been getting more attention because LiPo batteries and motors are widely available. The size of the LiPo batteries can vary, so determine the battery size needed before building. No matter what size you want to fly, there is an electric motor that will provide sufficient power.

CL Scale rules allow for glow engines up to 1.25 cubic inches and equivalent electric power. The largest engine I have flown with is a .90 size. I haven’t yet found a reason to fly with a 1.25-size engine.


Grant Hiestand’s 1/3-scale Spacewalker was built from a Sig Manufacturing kit, weighs roughly 19 pounds, has an E-flite Power 160 electric motor, and has a speaker system from Model Sounds Incorporated that sounds like the full-scale aircraft’s Continental engine.


One item judged during competition is realism. The judges look to see if the model is flown similar to how the full-scale aircraft would be. In addition to the takeoff run, landing, and flying, it also includes the engine’s sound. A four-stroke engine closely matches the sound of the full-scale aircraft. Electric power is quiet and does not sound anything like the full-scale aircraft’s engine, so expect a point deduction in realism if flying with electric power.

There are sound modules with a speaker that can be added that work with the speed control and create the desired scale sound. Grant Hiestand has flown his Spacewalker with a speaker that sounds like the Continental engine on the full-scale aircraft.

Electric power requires that electronic controls or 2.4 GHz for the throttle are used because the ESC can only plug into a receiver to work correctly.


Converting to CL

You need to understand how to position the line guide before flying the model. Because you will likely convert an RC kit, plans, or an ARF to CL, you will not have instructions for where to locate the line guide.

Mark the location of the center of gravity (CG) along the centerline of the fuselage, then extend a line to the wingtip that is 90° to the fuselage’s centerline. Offset the line aft of that line by multiplying half of the model’s wingspan by .052 to get a 3° line rake. This will make the model’s nose point outward from the circle during flight. See the figure that shows how to locate the line guide.

The vertical location of the line guide must also be determined so the model remains level in flight. If the line guide is too low, the aircraft will roll to the right after it takes off. If the line guide is too high, it will roll to the left.

One trick is to make a set of dummy lines and hang the model from the garage ceiling. As viewed from the front, the wing should be vertical. If looking at the airplane from the top, the nose should be pointed down by 3°.


This shows the location of the line guide based on the model’s CG and planform. You want 3° of line rake for the starting position of the line guide on the first flight.


Always make sure you have an adjustable leadout guide on a larger model so you can move it forward to decrease the line tension, or move it aft to increase it. Trimming the line guide ensures that you have enough line tension, but not so much that it pulls you over.

I have not mentioned the position of the bellcrank because it has little to do with trimming the model. The line guide location, overall weight, and CG will determine how much line tension you will get. I typically put the bellcrank’s center bolt 1 inch behind the model’s CG. I use a 4-inch bellcrank for the larger models, and a 3-inch one for smaller models.

The model will also need some wingtip weight. For RC, the model needs to be balanced along the fuselage’s centerline. CL models need weight in the right wing to counteract the line drag.

What about a rudder to keep line tension? I have multiple models with zero rudder offset and several models without any rudder at all. I mount the rudder with some stiff hinges so it can move, but it has zero offset.

Ailerons are effective and must be set to the neutral location for CL flight. One trick is to mount a standard servo to hold the location of the aileron and if the wind is gusty, move the aileron to a new position to counteract the wind. The aileron servo is not plugged into the receiver.


Joe Eiben’s P-51 was built from an ARF and has flaps, throttle, and retracts.


The only modifications from the RC instructions are three items:

1) Install a bellcrank, the leadouts, and the line guide to control the elevator.
2) Lock the rudder and aileron in the neutral position.
3) Add wingtip weight.


Where to Start

If you want to try CL Scale and are not sure about some of these ideas, build and fly an ARF for general flying. Select an engine/motor and a 2.4 GHz control system and give it a try. This allows you to experiment and if you make a mistake, it is no big deal. After flying your model for some time, you will know what you like and don’t like and before you start a more serious CL Scale project, you will have experience with a practice model.

Another option is to pick up a used model at an RC swap meet or auction and install a bellcrank and 2.4 GHz control system to give it a try. RC swap meets or auctions are a great way to find items for CL Scale models.


The bottom view of Joe’s P-51 shows its four-stroke engine, retracted landing gear, and the on/off switch for the 2.4 GHz controls.


Conclusion

CL Scale is all about the static score and mechanical or flight options during the flight portion. Scoring differs with each event, but is a combination of the static and flight scores. This means the model needs to look like the full-scale aircraft and also fly correctly. It is not uncommon for models to show up at a contest and do well with static points, but not score well with the flight points.

The static portion is all about the outline, detailing, colors, markings, and making sure the airplane accurately replicates the full-scale aircraft. This can be a fun event that allows a modeler to create his or her own fleet of models.

When I go to a hobby shop or hobby show, I look at the electronic devices, hardware, kits, motors, and engines for RC models to see if I can use them for CL Scale models. You never know what you might find that can be used for your next project.

The AMA Special Interest Group for Scale is the National Association of Scale Aeromodelers (NASA). It is responsible for organizing and running the annual RC and CL Scale Nats. NASA’s website has all of the judging forms and plenty of information related to Scale modeling.

I have a YouTube channel with videos on how to set up CL Scale models with 2.4 GHz for glow- and electric-powered models. There are also videos showing several models flying so you can see and hear some the items that have been covered in this article. Search for my name and look for my channel.

I have also included several companies in the “Sources” listing for some of the equipment mentioned in this article.

Good luck with your next project! Land softly!

—Fred Cronenwett
clscale@rocketmail.com


Sources:

NASA
www.nasascale.org

MBS Model Supply
(785) 256-2583
www.mbsmodelsupply.com

Brodak Manufacturing
(724) 966-2726
www.brodak.com

BMJR Models
(321) 537-1159
www.bmjrmodels.com

Model Sounds Incorporated
contactus@modelsoundinc.com
www.modelsoundsinc.com

Motion RC
(224) 633-9090
www.motionrc.com

Dave’s R/C Electronics
(423) 332-7504
www.davesrce.com


AMA News District VI: November 2017

$
0
0


Written by Randy Cameron
Column
As seen in the November 2017 issue of
Model Aviation.


Bonus Photos

Model Aviation Magazine - AMA News District VI


The following event report comes from Rege Hall of the BlackSheep R/C Club in Danville, Indiana.

Our 2017 National Model Aviation Day event, held on August 12, 2017, to support the Hoosier Veterans Assistance Foundation (HVAF), is now in the record books. Early count for our fundraising efforts is at least what we collected last year. (The photo shows $7,500.)


Thanks to all who helped set up on Friday. The day officially started with the Danville Boy Scout Troop 301 presenting the flag as our national anthem played over the loud speakers. Models of all types and sizes were represented on the flightline for the crowds to look at. Aircraft were in the air from around 8:30 a.m. until after 6 p.m. The flight simulator tent was busy all day.


/h5>

Special thanks go to all who raised money to support HVAF. Bill Clontz is certainly the master. Tom Carlyle really beat the bushes again this year for more than 60 items donated to our raffle from local businesses. Thanks also to Mark Marshall for the Tempur Sealy donation and to Tom Hatfield for the Richard Petty driving experience. There were lots of happy raffle winners. We sold more than 120 pulled-pork and pulled-chicken lunches and lots and lots of raffle tickets.

The crowd enjoyed the noon air show. A variety of aircraft was present and it was the first time many had seen actual gas turbine-powered RC models including Rege Hall’s Turbinator and Ryan Jones’ Super Viper. Faron Trosper and Harold Etling opened the noon demos with an RC skydiver.


On August 12, 2017, I was invited to attend the Control Line (CL) square dedication by the Lafayette Esquadrille CL Club secretary, Fred Cronenwett. (Fred won the CL Profile Scale Nats this year.) The CL square was reopened after resurfacing because of floodwater damage.

The club put in a lot of labor repairing the field and it looks great. The Greater St. Louis Modeling Association and an AMA Flying Site Disaster Grant helped provide funding for the repairs. I can’t wait to get back to Buder Park for the Spirit of St. Louis USA World Cup, and F2A CL FAI Speed Contest, on  October 5-6, 2017.


Also attending the event were Associate Vice President Bob Underwood and many club members. During the dedication, John Moll flew his P-3 Orion.

I also got to attend the AMA Foundation for the Future Jet Rally in Ottumwa, Iowa. The first-time event seemed to be successful. The town and airport were appreciative of the modelers.


It was great seeing many District VI members attend. Tim Townsend, Lance Campbell, Lewis Patton, Dan Landis, and Greg Alderman, to name a few, flew in the event. There were roughly a dozen other District VI members there for the show and to support the AMA Foundation. Thank you all! I hope you all had a great time.

A special thanks to Dan Bott, Joel Wilson, and AMA’s Mandee Mikulski, Crystal Pearson, and Ilona Maine for working the event and making it possible. The speed trap was especially interesting.

-Randy Cameron
flyrcam@gmail.com


2017 National Aeromodeling Championships

$
0
0


Written by various authors
A look back at the 2017 competition
Event coverage
Read the full feature in the November 2017 issue of
Model Aviation.


The 2017 Nats, an annual favorite event for many pilots from across the country and around the world, kicked off June 23 and concluded August 3. Most of the events were held at the International Aeromodeling Center (IAC) in Muncie, Indiana, while two were held in other locations.

For the first time, the RC Aerobatics (Pattern) Nats were held in Blytheville, Arkansas, at the historic Eaker Air Force Base, which is known today as the Blytheville Air Force Base. National Radio Controlled Scale Aerobatics (NSRCA) officials moved the event there in hopes of attracting pilots from other areas of the US to the competition. This year’s July 25-29 contest had 76 registered pilots.

For the second consecutive year, the Indoor Free Flight (FF) Nats took place at the Rantoul National Aviation Center, in Rantoul, Illinois. The number of competitors was slightly less this year, but those who attended took advantage of some site improvements.

To see more from the 2017 Nats, view albums for each event on the AMA Flickr page at www.flickr.com/photos/modelaircraft. You can also read daily reports in NatsNews at amablog.modelaircraft.org/nats.


VQ Warbirds T-34C Turbo Mentor

$
0
0


Written by Terry Dunn
Fly the popular Navy trainer
Product review
As seen in the November 2017 issue of
Model Aviation.


Bonus Video


Specifications

Type: ARF warbird
Wingspan: 61.4 inches
Wing area: 623 square inches
Length: 46 inches
Radio: Futaba 14SG 2.4 GHz transmitter; Futaba R7008SB receiver; two Futaba S3152 standard digital servos; four Futaba S3150 digital mini servos
Needed to complete: Power system; radio gear; basic assembly tools
Minimal flying area: Club field
Price: $239.95


Test-Model Details

Power system: Electrifly RimFire .46 brushless motor; APC 11 x 7E propeller; Castle Creations Phoenix ICE Lite 75 ESC; Pulse 5S 4,500 mAh 35C LiPo battery; Castle Creations BEC Pro
Power output: 59.5 amps, 1,152 watts
Power loading: 135 watts per pound
Flying weight: 8.5 pounds
Wing loading: 31.6 ounces per square foot
Duration: 7-plus minutes


Pluses

• Great scale looks with panel lines and rivets.
• Powerful warbird flight performance.
• Parts are included for glow or electric power.


Minuses

• Some assembly steps are challenging.
• Modifications are required to install the optional retractable landing gear.


Product Review

The T-34 Mentor is an unsung hero of our military arsenal. Since it was introduced in the mid-1950s, the Mentor has been used by the US and several allies as a trainer and general support aircraft. There is even a light-attack variant. That’s quite impressive for an airplane based on a civilian design: the venerable Beechcraft Bonanza.

Early T-34 airplanes were powered by a 225 hp, six-cylinder piston engine. A more powerful turboprop version, the T-34C Turbo Mentor, was designed in 1973. Examples of this aircraft can still be found in U.S. Navy hangars.

The VQ Warbirds replica of the T-34C is a balsa and plywood ARF with a wingspan of slightly more than 61 inches. It can be powered with either an electric motor or glow engine. It certainly captures the look of a T-34C. Right out of the box, it has many interesting features and unique scale details.


Assembling the T-34C

This model provided my first inside look at a VQ Warbirds product. The kit has a lot to like. Not only are the wooden components pre-covered with iron-on film, but the covering has printed insignia, panel lines, and rivets. Those features alone provide a tremendous boost to its scalelike appearance. The covering on my kit did not have any wrinkles or loose areas.


The VQ Warbirds T-34C is a balsa and plywood ARF with nicely built components and great scale details.


At the risk of spoiling the ending, I’ll tell you now that this kit produces a great-looking and terrific-flying model; however, my path to that outcome was not always smooth.

Although the factory-built components are quite sturdy and well made, integrating those pieces occasionally required slight improvisation. I’ll point out the problem areas in my rundown of the assembly process. Most modelers who have previously assembled ARFs will be able to recognize and work through these hiccups.

Assembly begins by installing the aileron and flap servos. The manual specifies full-size servos for the ailerons, but the mounts are sized for mini servos. I used four Futaba S3150 mini digital servos. They fit the factory cutouts perfectly. I found it easiest to mount the servos with the output shafts located away from the hinge line.

The provided pushrods attach to the control horns with a threaded metal clevis. An EZ connector is used on the servo side. I’m not a fan of EZ connectors, so I put a Z-bend in each of the pushrods with my Hobbico Z-bend pliers. The resulting linkages are strong and slop free.

The kit includes fixed landing gear with simulated gear doors that provide a nice, scalelike touch. VQ Warbirds offers a set of retracts specifically designed for the Turbo Mentor. I installed the retracts on my model. These are nice-looking units with functioning oleo struts.

The gear requires some assembly. No instructions are included, but the steps are intuitive. I suggest filing flat spots on every shaft that interfaces with a setscrew. Be sure to use threadlocker on all of the machine screws as well.

I had to perform a few tweaks to the airframe for it to accept the retracts. The openings for the wheel wells in each wing were slightly small. I used an X-Acto knife to cut through the wing sheeting and elongate the openings by roughly 1/4 inch.

A plywood rib within the wheel well prevented the main wheels from fully retracting. A similar issue affected the nose gear. I simply sanded away the problem areas with a sanding drum in my Dremel tool.

The tail feathers are glued into factory-cut slots in the fuselage. My example came out perfectly square, with no shimming required. The elevator and rudder horns are held in place with snap-in keepers. The manual instructs you to add CA glue to the keepers. I’ve seen similar control horns on park flyers, but never on a model as large as the T-34C. I was concerned about the durability of this setup, but it has worked perfectly so far.


Removing the large fuselage hatch provides open access to the roomy radio compartment. Note the plywood shelf that the author added to relocate the flight battery more rearward.


I used Futaba S3152 full-size digital servos for the rudder and elevator. I again used Z-bends in lieu of the EZ connectors. I did, however, use an EZ connector for the nose wheel steering linkage. All of the servos are wired to a Futaba R7008SB receiver with a Futaba 14SG transmitter.

Each of the wing panels slides over a tubular aluminum spar and is secured to the fuselage with a single bolt. When I initially inserted both wing panels onto the spar, there was a significant gap between the wing roots and the sides of the fuselage. I shortened the spar by 1/4 inch with my band saw to remedy the issue.

Mounts are included for using either a glow engine or an electric motor. A fuel tank is also provided. The glow engine mount uses a pair of nylon beams that bolt to the firewall with the engine horizontally oriented. A .46 two-stroke or .70 four-stroke engine can be used.

I decided to go with an ElectriFly RimFire .46 brushless electric motor and an APC 11x7E propeller. The electric motor mounting system is simple, but also tough and infinitely adjustable. Four 100mm-long 6mm bolts protrude through the firewall. A plywood motor mount is fastened to these bolts. The exact placement of the plywood mount is determined by adjusting nuts on the 6mm bolts. It took me a few tries to tweak the motor’s position so that it properly interfaced with the fiberglass cowling, but the result looks great.

The motor is controlled with a Castle Creations Phoenix ICE Lite 75 ESC. I was concerned that this ESC’s built-in BEC would be overtaxed by the demands of powering six digital servos and three electric retract units, so I used a Castle Creations CC BEC Pro connected to the flight battery to power all of the onboard radio gear.


The Turbo Mentor can use an electric or a glow powerplant. The author used a RimFire .46 brushless motor paired with a Castle Creations ESC.


The flight battery is a Pulse Battery five-cell 4,500 mAh LiPo. I appreciate that the battery comes with pre-tinned power leads. Adding a Deans Ultra Plug connector was a snap. Just as valuable to me, I found that all of the stickers are placed beneath the battery’s outer shell of heat-shrink tubing, rather than outside of it. This makes it easy to securely attach self-adhesive hook-and-loop tape.

The cockpit area is outfitted with a single pilot bust and instrument panel details. It looks nice and there is room to add more details. This kit also includes scale features that help differentiate the Turbo Mentor from earlier variants.

Large exhaust stacks for the turboprop engine are attached to the cowling. Other features specific to the T-34C include ventral fins on the bottom of the fuselage and strakes on the horizontal stabilizer. These accents add to the model’s overall appearance. I attached the parts using Pacer Formula 560 canopy glue.

My initial balance check indicated that the T-34 was going to be significantly nose-heavy. I decided to fabricate an extension to the battery tray that allows me to locate the battery approximately 3 inches rearward. I cut a simple rectangle from 1/4-inch light plywood and attached it to the stock battery mount with a combination of 30-minute epoxy and wood screws. The battery is held to this mount with hook-and-loop tape as well as a strap.

With the battery in this modified location, I still had to add 11/2 ounces of ballast to the tail to achieve the suggested center of gravity location. My completed, ready-to-fly Turbo Mentor weighs 81/2 pounds.


These plastic strakes are a nice scale accent for the T-34C. Masking tape holds the parts in place while the canopy glue used to attach them to the model dries.


Flying the Turbo Mentor

All of my flights with this model have been from a grass runway. As you would expect from a model with tricycle gear, it tracks well and is easy to handle on the ground. The power system has plenty of pull to get the T-34C quickly up to flying speed if you want, but gradual, scalelike takeoffs look better.

After it is in the air with the landing gear tucked away, the Turbo Mentor cleans up nicely. It might look like a trainer, but it flies like a fighter! This is not an aircraft for inexperienced pilots. The model has a good combination of speed and vertical performance. My T-34C even cuts through the air with a great-sounding whistle!

I found the suggested control throws to be too sedate for my taste, especially the ailerons. I reprogrammed them to have 3/4 of an inch of throw on high rates, and 3/8 inch on low rates. I applied less dramatic increases to the elevator (9/16 inch on high; 3/8 inch on low), rudder (13/4 inch on high; 1 for low), and flap throws (9/16 inch for half; 11/8 inch for full).

The T-34C likes to be flown fast. It feels solid and tracks well. High-rate aileron rolls are quick and axial. Low-rate rolls require only a little elevator correction. The RimFire .46 motor pulls this model through large, round loops and tall Hammerheads. Vertical performance is good, but not unlimited. There’s plenty of pull on tap for any type of warbird maneuver you can dream up.

Rudder authority is sufficient for Hammerheads and stall turns. I can’t quite get the T-34C to do knife-edge flight, but long, banked photo passes are a thing of beauty. I’ve been setting my timer for 7-minute flights and finding that I still have quite a bit of reserve power when I land. I will continue to expand my flight time comfort zone.


This might be a model of a trainer, but it has the performance and handling of a fighter!


I prefer to take off with half flaps. The Turbo Mentor simply flies itself off of the runway. When it comes to landing, I might choose either flap setting, or none at all. It all depends on how much wind is blowing down the runway. Calm days call for full flaps to help slow my approach and shorten the rollout.

The internal rods of the main landing gear are slightly soft and can bend rearward during landing on rough runways. The good news is that they can be bent back into place without disassembly.


Final Approach

Despite a few minor challenges during assembly of the T-34C, I’m happy with the finished product. My only gripe with its appearance is its elevated stance on the landing gear, but that’s a trifling (and possibly correctible) issue.

The VQ Warbirds Turbo Mentor T-34C is really at its best in the air. Not only is this model fun to fly, but it has a great look, a great sound, and a powerful presence when it takes to the sky.

—Terry Dunn
terrydunn74@gmail.com


Manufacturer/Distributor:

VQ Warbirds
info@vqwarbirds.com
www.vqwarbirds.com


Sources:

Futaba
(800) 637-6050
www.futabarc.com

Castle Creations
(913) 390-6939
www.castlecreations.com

Pulse Battery
(978) 206-6037
www.pulsebattery.com


Horizon Hobby Carbon-Z Cessna 150 2.1m BNF Basic

$
0
0


Written by George Kaplan
Fly this gem of civilian aviation
Product review
As seen in the November 2017 issue of
Model Aviation.


Bonus Videos


With Floats


Specifications

Model type: Semiscale BNF
Skill level: Intermediate
Wingspan: 83.7 inches
Wing area: 1,053 square inches
Airfoil: Semisymmetrical
Length: 61.8 inches
Weight: Recommended 8.9 to 9.9 pounds; actually 8.75 pounds
Power system: E-flite BL50 brushless motor and E-flite 60-amp ESC (included); requires a 4S to 6S 4,000 to 7,000 mAh LiPo battery
Radio: Spektrum AR636A receiver; EFLR7155 and EFLR7145 servos come preinstalled
Price: $399.99 BNF Basic; $379.99 PNP


Pluses

• Large sport scale model assembles in roughly an hour.
• A wealth of LED navigation and collision lights come preinstalled and are powered by the flight battery.
• Scale details include flaps, wheel pants, antennae, fuel tank caps, and more.
• The plug-in wing halves incorporate a hands-free servo connection system and need no tools to assemble at the field.
• Included AR636A receiver has AS3X stabilization and SAFE Select correction (optional).
• E-flite 60-amp ESC and BL50 brushless motor included.
• Hatches for access to the radio and the battery compartment are large and easy to remove.
• Has shock-absorbing landing gear for grass strips.
• Optional float kit and wire mounting set available. Tricycle gear is easily removed and the assembled float kit is bolted in its place.


Minus

• The wheels, especially on the nose gear, had quite a bit of play on the axles (up to 3/16 inch), which caused rattling when taxiing and in the air. This can be reduced by adjusting the position of the wheel collars inside of the wheel pants.


Product Review

Dozens of iconic aircraft have come and gone since the Wright brothers first took to the air in 1903. On the civilian side, one of the most recognized brand names is Cessna. The company has produced several iconic designs.

In 1958, Cessna introduced its model 150, a first for the manufacturer, with tricycle gear, squared-off wingtips, and large Fowler flaps. Many variants were produced and one of the more exciting was the 150 Aerobat (the K model). This upgraded design brought limited aerobatic capabilities with a strengthened airframe, four-point harnesses for the pilot and copilot, dual overhead skylights for better upward visibility, and many other improvements, which earned it a +6/-3 G rating for mild aerobatics.

One of the Cessna 150K’s more notable upgrades was a sporty checkerboard paint scheme that set it apart from a typical 150. This aerobatic version is the basis for Horizon Hobby’s latest offering: the Horizon Hobby E-flite Carbon-Z Cessna 150. With an 84-inch wingspan, this model is one of the larger foam models that I’ve had the chance to review, so let’s get started.

To reinforce just how big this model is, it comes in a box that’s nearly 5 feet long, 2 feet wide, and nearly a foot high! All of the airframe parts were securely held in place in a foam cradle inside the box with a good amount of tape and foam sheets to pad the parts against chafing during shipment.


With most of the work done at the factory and using many of Horizon Hobby’s design innovations, the Cessna 150 will go from box to flight-ready in roughly an hour.


All of the smaller parts came in a series of small, reclosable polybags. Every review requires a parts layout shot, which gives me the chance to get a good look at everything that goes into a kit.

The first thing that impressed me about the 150 was how rigid the airframe components were, considering they are all made of molded foam. You might expect some flex in the foam, especially in the wing and stabilizer, but that’s not the case. No doubt, this is because of the carbon fiber and other internal structural components that are incorporated when the parts are molded.

While I’m on the subject of the wing, both halves come with the flaps, ailerons, servos, and pushrods preinstalled. There are no servo leads dangling from the root. The Cessna 150 utilizes E-flite’s hands-free servo connection system, making the connections as soon as the wing halves are joined.

A keen eye might note that there are three of these connectors. There is one for the aileron, one for flaps, but what is the other one for? It’s for the wingtip lights. These lights, as well as those on the fuselage, mimic the navigation, collision, and landing lights that you’d see on a full-scale Cessna 150.

Moving to the fuselage, most of the assembly will focus here because many parts still need to be attached. The aircraft does, however, come with much of the work already finished. The radio and servos are preinstalled and the pushrods and clevises are also attached. Two hatches are built in—one is on the top of the cabin area to access the radio and the other is a larger one consisting of the front windscreen and rear cowl. This hatch provides access to the ESC, battery installation area, and the on/off switch.

At points where components will attach to the fuselage, smaller plastic subassemblies are installed. These plastic pieces should hold up far better than trying to attach to the foam itself.

The Cessna 150 is white with red stripes and black trim. Most of the red is painted on, whereas the black trim (like the checkerboards) is mostly made of a series of stickers.

Similar to the wing, the stabilizer comes in two halves supported by a smaller tube. The elevators are rejoined to the stabilizer halves, but interestingly, the rudder is separate from the vertical fin, possibly to keep the size of the box down.

Various other small parts are included, such as the landing gear, wing struts, front of the cowl, screw packages, etc.

Finally is the power system. A 60-amp ESC is preinstalled and the kit comes with an E-flite BL50 brushless motor, a 15 x 7 composite propeller, and a plastic spinner.


Assembly

The Carbon-Z Cessna 150 goes together with a variety of screws. I won’t describe all of the steps, but you can see them for yourself by downloading the manual from the Horizon Hobby website.

The only problem I had with assembling the model was that the pushrod for the steerable nose gear was too long. A 90° bend is prebent into the pushrod, where it attaches to the servo arm, but the bend was approximately 3/8 inch too long. This presented a problem because the rudder’s pushrod also attaches to this same arm.

Although a lot of work could have been done through clevis adjustments, subtrims, and other adjustments in the transmitter to make this work, I chose to rebend the pushrod at the correct spot and cut off the excess rod—a simple solution. Other than that, the rest of the fuselage construction is fairly straightforward.

Internal access to the servos, pushrods, receiver, and binding plug is gained by removing the top hatch. Although not cavernous, there was enough room to slip one of my large hands through and work as needed. Two hands? Not going to happen.

Up front, the motor is bolted into place and the front part of the cowling is installed. I mention this only because there are two super-bright LEDs that have to be plugged in, which add another nice touch to the Carbon-Z Cessna 150’s looks.

The manual suggests installing the propeller at this point. I advise you to install it temporarily to check the rotation of the motor, but then immediately remove the propeller until after the assembly is completed and you’re ready to check the center of gravity (CG). Too many accidents happen with propellers attached to live motors in workshops. Safety first!


A large hatch is built into the front of the Cessna’s fuselage and it provides plenty of space in which to insert the LiPo battery. The aircraft’s power switch is also hidden under this hatch.


A bit of thin CA adhesive is needed to attach the rudder to the vertical fin. It uses four CA-type hinges and the manual doesn’t spell out whether foam-safe glue should be used. I decided to test this by using regular, thin Bob Smith CA adhesive on one of the hinges. To my surprise, it worked as it should, so there was no need for foam-safe CA.

CA adhesive is also used to attach the cover to the top of the rudder. A few drops of thin CA hold the LED in place.

I think you could consider the stabilizer halves removable for transport/storage, but I’m leaving mine in place. Each half is supported by a composite rod and held in place by a 3 x 12mm screw.

If you’ve ever had an airplane with wing struts, you likely have found that they can be a pain to attach/detach/store/transport. Well, the struts on the Cessna 150 are made to fold flat against the wing when removed, but also easily unfold and push into place when attaching the wing.

No tools are needed to attach the wing halves because the struts are held to the fuselage with a pin clipped in place, and the wing halves are held against the fuselage with a proprietary thumb screw. When attached, pop the top hatch back into position and you’re ready to go.

Popping open the front hatch gives you access to the battery compartment. A 6S 5,000 mAh LiPo battery was supplied for this review and it easily fits in the compartment with room to spare. The battery is held in place with hook-and-loop strips. After the power is connected, flip on the power switch and you’ll see the Cessna 150 come to life. The LEDs around the model immediately come on—some constant, some blinking, and all in proper white, red, and green. A few seconds later, the AS3X system initializes as seen by the control surfaces going through their setup “jiggle.” The ESC beeps for each of the cells attached and the Cessna 150 is ready for takeoff.

Something I didn’t cover was the receiver setup. The manual explains this well, and you can choose to program the SAFE system if you like.

Spektrum’s website has a long list of setups that can be downloaded and installed in current Spektrum transmitters. I selected mine (DX18) and found the Carbon-Z Cessna 150 on the list. After downloading the setup file to the SD card, it was easily installed as a new model. All I did was bind the receiver, double-check that the throws were correct, and I was ready to go.


The author loves this hands-free servo connection system that Horizon Hobby has incorporated into the plug-in wing halves. There are no servo extensions to forget, plug in backward, or pinch during assembly!


Flying

Similar to many club fields, mine has grass between the pit area and the runway. Normally, I carry my airplane out to the runway because it’s a little rough, but I decided to taxi the airplane out to the runway to see how it would handle. To my surprise, it rolled through the grass with no problems. The shock-absorbing gear did its job as the model rolled along.

I noticed some rattling from the gear as it bounced along. Some of this can be fixed by adjusting the wheel collars—lessening the side-to-side movement of the wheels.

On the runway, the nose gear has ample steering—so much so that at low speeds, the Carbon-Z Cessna can turn tightly enough that it will almost spin in place.

One thing that I like to do with any electric-powered airplane is to adjust the throttle trim so the propeller will spin at the lowest “idle” setting when the throttle is in its low position. You’ll understand why I mentioned this later.

To say that the takeoff run and climbout were uneventful would be an understatement. Gradually advancing the throttle saw the Cessna 150 take to the air in roughly 200 feet without flaps, and at approximately 2/3 throttle. Holding this throttle setting, the model climbed out at roughly a 20° angle, just as you’d see with any full-scale Cessna.

Photo passes are always first on the list and comfort level. The AS3X stabilization made it easy for the Cessna to perform rock-solid passes.

The only other thing that I like to do on a maiden flight is test the aircraft’s low-speed characteristics, especially on any model with flaps. To do this, I first start a few mistakes high and simply slow the aircraft until it stalls.

The Carbon-Z Cessna 150 slowed nicely and had no bad habits. It did not drop a wingtip or snap, even with the elevator in the full up position. It simply dropped in altitude as the speed dropped.

Flaps were assigned to a three-position switch. When activated, the flaps will cause the aircraft to climb slightly when at higher speeds. At slower, landing-approach speeds, however, there’s no noticeable climb when lowering the flaps.


In the air, the Horizon Hobby E-flite Carbon-Z Cessna 150 is a blast to fly. Go low and slow with the flaps out, or speed things up and put on an air show with loops, rolls, snaps, spins, and more.


Next up were a few touch-and-gos. With no flaps, the Cessna 150 prefers to come in as you’d expect, with a slightly longer, shallow approach. Dialing in flaps allowed me to approach the runway at a higher angle. Because the propeller is spinning at low idle, it acts much like a brake—working in tandem with the added drag of the flaps to slow the Cessna in a controlled manner.

With all of the slow stuff out of the way, it was time to see if the Cessna 150 lived up to the “K” status, and I’m happy to state that it didn’t disappoint. Because of its design and size, it’s not what I’d call a “snappy” aerobat; instead, it is measured and methodical. By that I mean nothing happens quickly. The Cessna’s maneuvers are large and graceful, which give it an in-the-air presence of a much larger airplane.

If you look at the International Miniature Aerobatic Club (IMAC) Novice sequence, everything that you see there is in the Cessna 150’s repertoire. It might not be as crisp as an Extra or Edge would be, but there’s more than enough power and performance to have a ball snapping, spinning, and looping your way through the sky.

Inverted passes? They are not exactly scalelike, but no problem. What about an Avalanche? It looks nice with that graceful snap at the top. Point rolls and knife-edge flight? Yes, there’s more than enough power and rudder to do them all the way across the field, but you’ll have to feed in a bit of aileron and elevator to keep the aircraft on track.

Flight times on the 6S 5,000 mAh LiPo battery will vary depending on how heavy you are with the throttle. If you cruise around in a non-aerobatic way, with touch-and-gos and simple maneuvers, you could achieve flights close to 15 minutes with power to spare. With throttle-heavy aerobatics, flight times are in the 8- to 10-minute range.


Carbon-Z Float Set

The Carbon-Z Cessna 150 can also be outfitted with optional floats. Horizon Hobby supplied a set of those for the review, so I refitted the Cessna 150 to fly from water.

One note on this: If you order the float kit, you also need to order the separate wire mounting set. It’s the Wire Mounting Set for CZ Cessna 150: Carbon-Z Floats (EFLA5605).

Assembling the gear is easy, but you have to pay attention, especially when fastening the brackets to the floats. The brackets have varying hole sizes that need to be positioned correctly for each of the wires to properly attach.

The left float has a servo and pushrod already embedded in the foam. I state that it’s embedded because it’s built in and inaccessible. The steerable water rudder is attached to the back of this float and the pushrod’s clevis snaps into the steering arm.


Not a land lover? Add the optional float kit and you can have just as much fun flying off of your local pond, lake, or reservoir. Swapping between fixed gear and floats takes roughly 10 minutes.


Attaching the floats to the Cessna 150 is a simple matter of unbolting the main gear from the fuselage then bolting on the supplied replacement pieces. The wire from the float’s rudder servo plugs into the bottom of the fuselage. A couple of molded plastic plates are attached to the floats. Pay close attention to how these are mounted because the instructions are unclear. In particular, the front pair of plates has holes in three sizes—the smallest of which should face aft. This is not covered in the instructions.

After the floats are assembled, the changeover between regular landing gear and floats takes approximately 10 minutes. On the water, the float kit works as advertised, but with two notable things. First, I’d love to have more rudder authority. The Cessna 150 is a larger airplane and can easily weathervane on the water in strong wind.

The second is that the port float (the one with the servo) can take on water. It didn’t have any noticeable effect in flight, but when I took it back to the pits, I heard water flowing through the float when I picked it up. My guess is that the water is entering through the back of the float where the pushrod is. I hope it won’t affect that embedded servo, but only time will tell.


Conclusion

E-flite’s new Carbon-Z Cessna 150 is one of those designs that can satisfy many modelers’ tastes. For those wanting trainerlike performance, the aircraft delivers with its easy flying abilities, AS3X stabilization, and optional SAFE Select system.

If you’re looking for a sport scale model with more detail than your average ARF, the Cessna 150 delivers. If you want a wide range of aerobatic capability, it delivers yet again. This great-flying model assembles quickly, goes together easily at the field, and has really caught the eye of many in my local club.

—George Kaplan
flyingkaplan@yahoo.com


Manufacturer/Distributor:

Horizon Hobby
(800) 338-4639
www.horizonhobby.com

E-flite
(800) 338-4639
www.e-fliterc.com


Sources:

Spektrum
(800) 338-4639
www.spektrumrc.com

Cessna manual
www.horizonhobby.com/pdf/EFL1450-Manual-EN.pdf

IMAC
www.mini-iac.com


Phoenix Model Piper J-3 Cub GP/EP/Gas ARF

$
0
0


Written by Greg Gimlick
Yes, this Cub has flaps!
Product review
As seen in the November 2017 issue of
Model Aviation.


Bonus Video


Specifications

Model type: Giant Scale
Skill level: Intermediate
Wingspan: 90.5 inches
Wing area: 1,219 square inches
Airfoil: NACA
Length: 60.6 inches
Weight: 13.2 to 14.3 pounds
Wing loading: 25 ounces per square foot
Power system: RimFire 1.20 brushless motor; 85-amp ESC; 6S LiPo battery; 17 x 8E propeller; or 20cc two-stroke gasoline or 1.20 glow engine
Radio system: Eight-plus-channel transmitter; seven standard size, high-torque servos (two aileron, two flap, one elevator, one rudder, one throttle if using gasoline engine); 6-volt 2,400 to 2,600 mAh NiMH receiver battery
Construction: Wood, fiberglass, and Oracover
Price: $299.99
Need to complete: Eight-plus-channel radio; seven servos; receiver battery; power system


Test-Model Details

Power system: RimFire 1.20 brushless outrunner; Castle Creations Edge 120 HV ESC
Battery: FlightPower FP70 6S 5,500 mAh 70C LiPo
Propeller: APC 17 x 8E
Radio system: Futaba 14SG transmitter; six Tactic TSX45 Standard High-Torque Metal Gear 2BB servos; Futaba R7008SB receiver; Hobbico LiFeSource 6.6-volt 2,100 mAh 10C battery
Ready-to-fly weight: 14 pounds, 5 ounces
Wing loading: 27.1 ounces per square foot
Flight duration: 8 to 12 minutes


Pluses

• All-wood construction is beautifully covered.
• Fiberglass cowl.
• Fully detailed canopy/cockpit with removable pilot.
• Includes mounts for electric or gas power.
• Excellent hardware package.
• Fast and easy to assemble at the field.
• It’s a Cub!


Minuses

• Landing gear is heavy and the paint didn’t match.
• Non-scale wing struts.


Product Review

I had good and bad first impressions of the Phoenix Model Piper J-3 Cub GP/EP/Gas ARF—actually only one bad impression. Everything looked beautiful as I unwrapped it. The glasswork and paint on the cowl was a thing of beauty.

Then I unwrapped the landing gear and the paint wasn’t even close. It’s yellow, but nowhere near Cub yellow. I’ll get a can of paint and fix that. The covering on the model was flawless and showed no signs of coming loose during shipping.


The pieces of the Cub are unpacked, but still in their protective wrapping.


The next impression made me remind myself that this is a sport scale model and not truly scale. This Cub has flaps and the full-scale aircraft doesn’t. The wing struts are also non-scale.


Assembly

As with any ARF model, begin by carefully inspecting everything then spend an hour with the covering iron. Go over everything, even if it looks tight when you unpack it. This will be rewarded when you take it out on a 90° day. Read the instructions and check online to see if there have been any corrections added. There weren’t any when I assembled mine.

The wing servos and controls are the first step and probably the biggest. Everything is pre-slit for the hinges and the servo mounts are preinstalled on the hatch covers. All of the control surfaces employ horns that fit precut, keyed holes and slots. They are secure and use backing plates throughout. The wing mounts on two large wing tubes and is secured with a captured bolt at the fuselage. Struts further secure the wing.

The landing gear takes only a few minutes to assemble. At 18 ounces, it’s heavy, but it’s extremely sturdy. The strut mounts bolt to the fuselage slightly aft of the gear. Secure the struts with quick-connect pins.


The gear is bolted to the fuselage ahead of the wing strut mounts. All of the blind nuts are preinstalled.


The tail surfaces fit snugly into precut slots. When you remove the covering from the center of the horizontal stabilizer for gluing, save the scrap of covering. The vertical stabilizer installs next and you must be sure to align the trailing edge with the back of the fuselage so that the hinging will properly align.

This left a small gap at the front of the vertical stabilizer where it meets the fuselage. I filled that with the scrap of covering that I saved.

All of the controls are connected to the servos using L bends and keepers with captured clevises at the horns. The elevator halves employ a “domino” to bring the two control rods together with the servo rod inside of the fuselage. Be sure to secure that with threadlocker!

The tail wheel assembly is a spring-actuated system. Be sure to attach the ends of the springs to the connecting points before bolting the mount in place. If you don’t, you won’t be able to rotate them through the ends of the springs.

Whether you’re using electric power or an engine, the mounts are included with specific instructions for each. I used a RimFire 1.20 electric motor and a Castle Edge HV-120 ESC that I already had. The ESC is overkill, but that’s okay. Everything bolted into place with the proper measurements because I used the recommended motor. If you use something else, the measurements to fit the cowl are in the manual.


The motor mount is assembled and the motor and ESC are installed on the bottom of the fuselage where they get great cooling air.


The final bits involve mounting the receiver, switches, pilot figure, and motor battery inside of the fuselage. This is accessed through the operational door and there is plenty of room for even the biggest hands. I secured the battery with Velcro on the bottom and a wraparound strap, positioning it as far forward as possible. The pilot is glued to the seat and the seat is held in place with Velcro, so I can easily remove it for radio access.


Control Throws and CG

It was a pleasant surprise when I checked the center of gravity (CG) and everything was exactly where it was recommended, without having to move a thing! I have room to move the battery if necessary, but I was glad to see it balanced the first time. I’ve used a few 6S battery packs that weighed 3 ounces less and there wasn’t a noticeable change in flight.

All of the controls were set to the values listed in the manual and they worked well. I increased the flap throws just for fun and added a bit more aileron, but you can adjust yours as you feel comfortable. Begin with the recommendations.


Phoenix Model used a nice, keyed control horn that mates to a hole in the control surfaces. The CA hinges have been fitted, but not glued in, when the kit arrives.


Flying

The day of the test flights was perfect except for the wind. The wind average was 10 mph, gusting to 16, with gusts as high as 22 mph. You work with what you have, and given the Cub’s size and weight, I decided to go for it. As it turned out, the wind wasn’t an issue. There was some excitement on the short final when gusts became extreme, but it never felt out of control.

Within a few feet, the tail came up and it trundled down the runway on the main landing gear like a champ—or a Cub! Climbout was solid and the power was more than adequate, even though I hadn’t gone to full throttle. Tracking on the ground and climbout were perfect. A quick check of the CG, stall, and control feel had me smiling. There is plenty of power for any type of aerobatic maneuver you feel a Cub is capable of—and then some.

During the stall tests, there was no tendency to drop a wing to either side. The Cub simply mushed along. It recovered easily from spins. My rudder throw is more than what is recommended and proved effective.


The author fastened the pilot’s seat to the floor of the fuselage with Velcro. It’s easily removed for full access to everything.


I made several approaches without flaps because the full-scale Cub doesn’t have them. It slows nicely and lands like a dream. Landings were easy with or without power, although in gusty conditions, it helps to keep a little extra speed going.

My attempt to land with flaps was comical. The airplane floated forever! After I quit laughing at my folly, I adjusted my technique and managed to make some spot landings using full flaps.

Loops, rolls, inverted flight, Split Ss, Cuban 8s, spins, and other maneuvers—the 6S-powered RimFire 1.20 and the 17 x 8 propeller will have the power for you. Currents peaked at slightly above 60 amps, and I regularly had 10-minute flights. I suspect I could stretch it to 12 minutes with fewer aerobatics.


Conclusion

This Cub flies well and it looks great on the ground or in the air. It’s easy to swap out the battery between flights and the model easily breaks down for transport.

If you desire a more scalelike look, you might consider this as a great platform for kit bashing. Making it a Super Cub would be easy with a change of the cowl and some graphics. An internet search will find many variations and modified Cubs. You could probably document this one as a Scale model for one of them.


Spot landings using flaps are fun—after you get past the fact that this Cub has flaps.


Phoenix Model has a winner with this Piper J-3 Cub and the company’s attention to construction techniques makes it a joy to assemble. The RimFire power system is perfectly matched to the aircraft. I couldn’t be happier.

—Greg Gimlick
maelectrics@gimlick.com


Freewing A-4E/F Skyhawk 80mm EDF Jet

$
0
0


Written by Rob Dehner
Heinemann’s Hot Rod makes a great electric jet
Product review
As seen in the November 2017 issue of
Model Aviation.


Bonus Video


Specifications

Model type: PNP EDF jet
Skill level: Intermediate/advanced
Wingspan: 37 inches
Wing area: 372 square inches
Airfoil: Delta planform wing
Length: 56.3 inches
Weight: 77.6 ounces
Power system: 80mm EDF
Radio: Minimum six-channel recommended
Construction: EPO foam
Covering/finish: Matte Navy gray over matte white
Price: $329


Test-Model Details

Motor: Freewing 3530-1850 Kv brushless outrunner
Battery: Admiral 6S 22.2-volt 4,000 mAh and 5,000 mAh (4,000 to 5,200 mAh with minimum C rating of 35C recommended)
EDF: Freewing 80mm with 12-blade impeller
Speed controller: Freewing 100-amp brushless with EC5 connector
Flight duration: 3.5-minute flights with 4,000 mAh battery


Pluses

• Nimble performance, efficient power system, excellent power-to-weight ratio.
• Includes both USAF and USMC waterslide graphics schemes, removable stores (two drop tanks, two AGM-12 Bullpup missiles), and removable 20mm cannon barrels and refueling probe.
• Excellent roll, climb, speed, and takeoff characteristics without sacrificing stability.
• Scale landing gear and detailed and functional split flaps.
• Multipin interface boards for easy removal of wings.
• Ball-link connectors on each hinged control surface for crisp performance.


Minus

• The nose gear strut is long and might not perform well or hold up to uneven grass or bumpy surfaces.


Product Review

Talk around the flying field and in the online forums made it abundantly clear that a new Freewing 80mm Scale electric ducted-fan (EDF) jet was on the way. Many jet pilots were hoping that the new EDF would be an 80mm A-4E/F Skyhawk. Nicknamed “Scooter,” this Vietnam-era warbird was designed by Ed Heinemann in the 1950s and focused on low-cost, outstanding performance, and a straightforward, durable design.

The famed Heinemann’s Hot Rod boasted a scorching 720° roll rate per second (two complete rolls per second), exceptional subsonic speed, and maneuverability that endeared it to many a military aviator.

The appearance of a large, Plug-N-Play (PNP) 80mm A-4 on the Motion RC website, festooned in either U.S. Marine Corps or U.S. Navy graphics with an included scalelike, removable dorsal blister held firmly in place by four strong magnets and plastic guide pins, had many EDF jet pilots jumping for joy!

An initial walk-around of this new EPO foam model reveals how successfully Freewing has rendered the scale lines and unique details of the full-scale aircraft. The model includes an accurately represented plastic molded/painted refueling probe and 20mm cannons, both of which are removable, and large outboard ailerons.


The EPO foam airframe comes out of the box prepainted and ready to accept one of the two included graphics schemes. A full complement of underwing armaments comes with the kit.


Freewing did a commendable job of reproducing the manner in which the ailerons blend into the wingtip area. This attention to scale detail also manifests itself on the elevator surfaces. The result is a truly accurate scale silhouette. A matte Navy gray color covers the upper surfaces, and a matte white covers both sides of each control surface and the underside of the model.

Intakes, fairings, antennae, tailhook, under-wing pylons, and the inclusion of six small, plastic leading edge (LE) aerodynamic “fences” add to the scalelike appearance. Each of the two jet intakes is framed in smooth red plastic, which adds a nice finishing touch in the appearance department and improves the foam composition airframe’s durability.

Scale main gear that rotate 90° before fully retracting into molded wheel bays grace the underside of the delta wing. Also on the underside is an example of a new feature for Freewing aircraft: thinly molded plastic split flaps. The flaps use plastic hinges, are painted red on the inside, and include accurate scale surface details.

Freewing even adds a convex molding that, with the flaps fully lowered, mates into the aft portion of each main gear fairing. Hardcore A-4 aficionados might lament the lack of functional LE slats on the model.

All servos are 9-gram metal gear, except the single elevator servo that is a beefy 17-gram metal gear. Each elevator surface is connected by an inconspicuous plastic spar. This is a different approach from other Freewing aircraft, which typically rely on two servos for each elevator surface.

Wrenching a little on each elevator surface reveals no indication of differential slop or looseness. Every control surface has quality metal pushrods and uses plastic hinges. Ball-link connectors are used on all servo horns. This hardware is a must for any intermediate-to-advanced model! Bravo to Freewing for taking its aircraft in this direction.

A slightly elongated nose gear strut results in the Freewing A-4 sitting on its landing gear in a manner that is similar to the full-scale aircraft. The small nose cone is easily removed from its magnetic holders and the tip is molded plastic.

The kit includes two accurately represented large EPO foam fuel tanks. These tanks were often used on the full-scale aircraft and they do justice to the Freewing A-4’s scale silhouette.

Also included are two AGM-12 Bullpup missiles. All stores are easily added to or subtracted from the A-4 via four underside stores pylons and associated magnetized fasteners.


Assembly

Assembly is straightforward, with both wing halves, elevator, and vertical stabilizer going together using the supplied screws. The kit includes the requisite tube of contact-style glue. It can be used to attach the antennae, fences, stores pylons, tailhook, and exhaust nozzle.


This PNP kit includes a silky-smooth 80mm Freewing EDF power system and assembles using fasteners and adhesive.


To easily remove the wing, Freewing uses multipin boards to aggregate aileron, flaps, and landing gear servo leads. The manual provides detailed instructions on pushrod/clevis/control horn setup with low- and high-rate settings for all control surfaces. The manual also includes recommendations for setting the flap deflection and elevator mixing in a pilot’s transmitter. It is recommended that modelers follow these instructions verbatim.

In connection with attaining the correct center of gravity (CG), there is an addendum in the manual that states that loading stores (the fuel tanks and/or missiles) will cause the CG to move slightly aft. To counter this, pilots should add their desired stores, check the CG, and then make any appropriate adjustments by repositioning the battery in the fuselage. The battery tray is lightweight wood stock. Pilots should mark the wood with a pen for the correct CG location when using different size batteries and also mark any CG differences resulting from stores options.

Add a receiver, secure a six-cell 4,000 to 5,200 mAh battery (there is plenty of room) in place with the supplied hook-and-loop strap, snap the spring-loaded, latch-equipped canopy in place, and this A-4 is ready to fly.


Flying

With setups and rates settings replicated according to the manual, high rates were selected for everything except the elevator. Thirty percent exponential was programmed all the way around. When performing the maiden flight on a new EDF, underwing ordnance can often improve visual orientation and even improve stability. With that thought in mind, the AGM-12 Bullpup missiles were loaded to the outer pylons.

A freshly charged 35C Admiral 6S 4,000 mAh battery was loaded all the way forward in the fuselage and the CG was verified. Pre-maiden flight thoughts that jet pilots might find themselves musing about include whether the nose-high posture of the A-4 will enable premature rotation during takeoffs and whether the relatively small delta wing, equipped with large outboard ailerons, coupled with an airframe that appears to have a higher CG, will create a model that is twitchy on the ground and dynamically unstable aloft.

The runway at the local club is constructed of a typical geotextile material and is relatively smooth. Slowly advancing the throttle spun the 12-blade Freewing impeller to life and created an incredible-sounding metallic whine and whoosh. The A-4 tracked straight and true down the runway, and with a little back elevator applied, transitioned into a clean rotation with a positive rate of climb.

The A-4 showed no sign of springing into the air on its own because of its nose-high stance. Many of the Freewing EDF jets are excellent at storing energy in the form of airspeed and do not necessarily depend on an excess of raw thrust.

At medium altitude, aerobatic maneuvers can be initiated at half throttle. Half Cuban 8s and full Cuban 8s, when performed in this manner, allow the model to zoom over the top without a hint of stall or elevator mush from an excessive loss of airspeed. Inverted flight requires little corrective elevator input. The A-4 feels as though it is on rails when performing full-flap, low-altitude passes on the deck. Aileron rolls at a mere half deflection of the right stick will cause this A-4 to perform some incredibly crisp, amazingly axial, and almost blindingly fast rolls.


After it is trimmed out, this jet rotates into the air on takeoff in a scalelike manner. A small bump of up-elevator is all that is required for liftoff.


The 80mm fan sounds smooth right out of the box, with no audible undulations, lack of power, or indications of imbalance at any throttle setting. Elevator response is precise, with the 17-gram metal gear servo capably doing its job.

Pilots will want to play it safe and start the transition into the landing pattern at approximately 31/2 minutes into the flight. Best practices for landing include dropping the gear and a first notch of flaps when on the downwind leg. A wide, gradual descent and decrease of power/altitude during the downwind leg and on through to base and final works best. Keep the turns shallow, with a little rudder added. The outline of this Vietnam War-era jet coming down the pipe with a steady rate of descent and constant angle of attack is amazing.

Decrease the power and the A-4 will touch down smoothly with plenty of runway left. Pilots need not feel concern that the scale split flaps are all drag and no lift. Freewing got the wing area and camber right and the result is a jet that is predictable and even slightly floaty on final approach. A 31/2-minute flight saw the 4,000 mAh six-cell LiPo battery with roughly 30% capacity left.


Conclusion

The 80mm Freewing A-4E/F Skyhawk, the latest Vietnam-era EDF in the Freewing lineup, is what many EDF enthusiasts have been waiting for. It has a big 90mm feel to it and an imposing presence in the air and on the ground. This A-4’s shortcomings are difficult to find. Although the main gear is large enough for operations from unimproved fields, the length of the nose gear and smaller wheel size could make grass operations slightly difficult.

The included military waterslide graphics look great, but pilots might wish to apply a coat or two of water-based polyurethane clear coating to help keep them firmly in place. And the large size of this 80mm airframe fairly begs for additional nomenclature markings!


Scalelike details include a tailhook, removable gun barrels, and a removable refueling probe. Pilots can choose to fly the A-4 with the magnetically retained avionics hump in place, effectively and instantly transforming the Skyhawk between an E and F variant.


This A-4 is a confidence-inspiring, scalelike performance machine. Any pilot with basic radio programming skills will have no trouble dialing up or down the desired level of performance commensurate to his or her piloting ability. Freewing and Motion RC have done a service to Scale aircraft modeling by designing this A-4 and remembering that durability, simplicity, excellent performance, and reasonable cost have their place. Heinemann would applaud!

—Rob Dehner
ofthesun5615@rocketmail.com


Manufacturer/Distributor:

Motion RC
(224) 633-9090
www.motionrc.com


Viewing all 1326 articles
Browse latest View live